Re-Inventing the Wheel?
For this article, I have used the term “informal operating systems” to differentiate less structured approaches from prototype-based operating systems. Steve King has used the term “fun run,” but I feel that term, while easily understandable, does an injustice to both approaches to operations. Those interested in prototype-based operations would not participate if they were not having “fun,” and those, who prefer a more relaxed experience, still want to learn about how the prototype does things. Consequently, I find the term “informal operating systems” more useful and less pejorative. (At the recent NMRA National Convention in Salt Lake City, there was a clinic titled “Operations without the Aggravation.” I find that also an effective way to label less formal approaches.)
Over the years, we have all been harangued by articles and clinics touting the benefits of prototype-based operating systems (TT/TO, track warrants, etc.). The main reason given is that prototype railroads have developed, tested, and refined these systems for many years in the real world, addressing the many situations that come up when operating a railroad. Why would anyone want to re-invent that wheel? Clearly, developing an operating system is not a simple task. Why not use a system already developed and tested?
While this argument is very convincing, it ignores an important fact – prototype operations are very different from model railroad operations. First, prototype railroads are businesses; model railroads are part of our hobby. Second, prototype railroading can be deadly serious; model railroading is supposed to be fun. Third, prototype railroaders are trained professionals; model railroaders are, for the most part, interested, sometimes informed amateurs. Whatever system of operations we choose, whether prototype-based or other, must address these differences.
The goals for prototype-based versus informal model railroad operating systems:
Prototype-based operating systems:
- To experience operating the model railroad as closely as possible to the way we might experience operating the prototype,
- To have an enjoyable and challenging experience with people knowledgeable about railroads,
- To meet the session’s challenges with the tools developed by prototype railroads, and
- To replicate the work prototype railroads do. (Creativity is not OK.)
Informal operating systems:
- To experience the model railroad in a railroad-like fashion,
- To have an enjoyable and relaxing experience with other people interested in railroads,
- To pretend we are professional railroaders (somewhat like re-enactors) and, from that effort, to learn things about prototype railroading, and
- To find solutions to the situations that come up without having to make efforts that are too much like work. (Creativity is fine.)
While these two sets of goals are not completely different, the emphasis certainly is different between them. Those differences greatly affect the operating system appropriate for a given model railroad. It may have been designed for prototype-based operations, and then again, it may not have been. Crew members may be interested in the challenges of prototype-based operations, or they may be more interested in a relaxing, enjoyable time spent with friends and acquaintances. The prototype being modeled may be a heavily trafficked mainline, or it could be a backwoods branch with two trains a day. Each of these sets of circumstances warrants a “custom” approach.
Prototype railroads understand that fact and address different situations with rules customized for each region and each operating district. “One size fits all” does not work for the prototype; unsurprisingly, that approach does not work for all model railroads either.
Problems with prototype based operating systems: Crews not interested in prototype-based operating systems have voiced numerous complaints. The following are some of the characteristics of prototype-based operations that superintendents might want to avoid:
- Too much paperwork: During the often hectic flow of the session, it is often impossible to find time to read, much less deal with, a sheaf of papers, especially when the piece of information needed is buried where it cannot be found easily.
- Hard-to read paperwork: The effort to make keep instructions and information easy to handle, often results in making them unreadable except with a magnifying glass. Also handwritten entries on forms are often illegible.
- Rule books – too much to remember.
- Clearances: Written clearances are an example of excess paperwork.
- In-depth pre-session introductory material and long verbal orientations – again too much to remember.
- Timetables, clocks and fast time: Crews want to watch their trains, not the clock (too much like work). Besides, a timetable is not easy to read while trying to run a train.
- Reporting requirements: Having to pick up the phone or radio every few minutes can be quite distracting.
- Complicated train instructions: Brevity and simplicity should be the main goal. Crews should be able to find what they need to do easily.
- Train orders written in “railroad English:” Prototype railroaders would understand; model railroad crews might not.
- Car forwarding information: Whether car cards, switch lists, or other systems are used, there is often much more information than needed. Also, carrying a large stack of cards around is always a challenge.
Undoubtedly, there are other problems crews might have with prototype-based operating systems, but the above list will suffice for now. (As will be discussed below, some of these items are essential for running a railroad.)
Problems with informal operating systems: After considering the numerous problems common to prototype operating systems, it is tempting to conclude that, by adopting an informal operating system, we can address all those issues and eliminate the things to which crews might object.
However, informal systems come with their own set of problems – a couple of them major. 1) By adopting informal procedures, we have essentially discarded the administrative organization that works so well for managing prototype traffic.
2) Crews may not have the information and directions they need to do their jobs. Between these two problems, it is almost certain that difficulties will arise. The following are some of the potentially maddening situations that develop when using informal operating systems:
- Sessions degenerate into confusion: This is perhaps the most serious criticism of the Mother, may I? operating system. Crews (sometimes behaving like spoiled children) all cry out for the host’s attention at the same time. As the number of problems encountered multiplies, the volume of cries increases. The host has far too much to deal with; the session becomes a confused mess.
- Situations get resolved without taking into account the railroad’s overall objectives: This problem arises when crews take it upon themselves to resolve a conflict by gentlemen’s agreement – such as the problem of too many trains in one location. The resolution may be quite creative; it may be quite satisfying. But, if the through freight gets held up by the local, that resolution is not the right one.
Worst of all, the crews involved miss an opportunity to experience how the prototype might resolve a similar problem.
- Crews blithely unaware of anything but their own train: That might work on a backwoods branch or a one-train-a-day shortline, but when more than one train is running, crews need to be aware of other trains and to coordinate their efforts with those of other crews. (This issue also comes into play when crews have to share aisle space.)
- Operating systems that do not address all aspects of operating the railroad: For instance, some layout owners consider having a car card system to be the same as having an operating system. That approach does not consider traffic management, and the car cards lack much of the information crews need to do their jobs. Crews have no sense of time, no information about other trains, no understanding of the superiority of trains, and no authority to use a specific track (in fact, no instructions about which track their train should be on). Confusion reigns. Of necessity, figuring out how to do a given job becomes the primary effort for the session. Enjoyment comes in a distant second.
The result of these situations can be an atmosphere of “chaos,” an atmosphere not conducive to having a relaxing, enjoyable time. Because crews do not have the information they need to do their jobs, they feel uncomfortable. They cannot enjoy themselves – the main reason for adopting informal operations in the first place.
What have we learned? Prototype-based operating systems come with quite a few rules and procedures: things that crews looking for a relaxed operating experience might object to. Adopting an informal operating system seems like a good way to avoid those objections. But informal systems often cast aside the organization needed to run a model railroad and often fail to give crews information needed to do their jobs. The result can be chaotic, quite the opposite of the relaxing, enjoyable experience desired.
Adopting an informal operating system does not have to degenerate into chaos if some effort is put in place to establish basic organizing principles and to give crews the information they need to do their jobs.
Part two of this article will endeavor to discover ways to correct the deficiencies of informal operating systems and will open discussion of the enjoyment possible when adopting such informal systems.
Read Part 2.
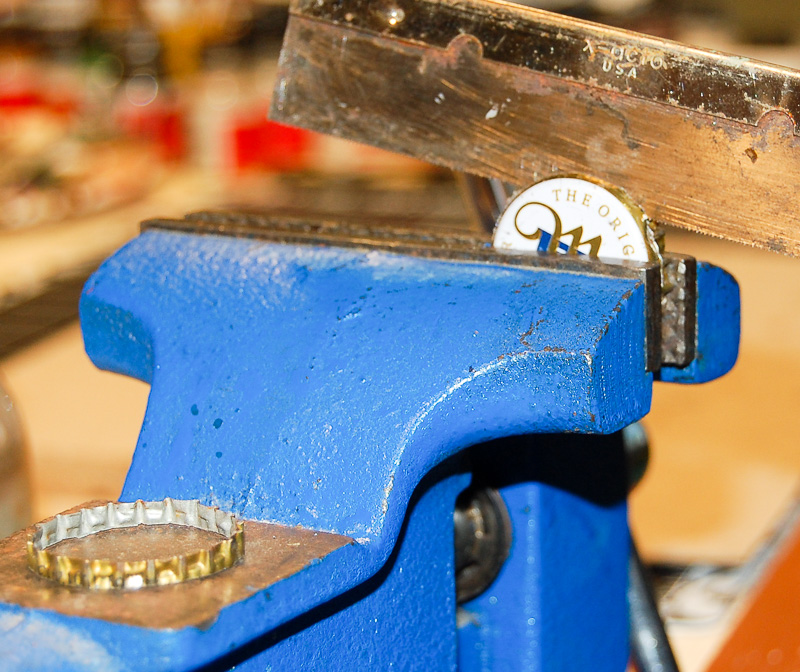 As the pics show, the knurled apron of the cap can be sawn off in a vise. It is necessary though to put a spacer within the cap in order not to pinch the saw blade. The cap must be rotated as one cuts through it so as not to cut into the spacer.
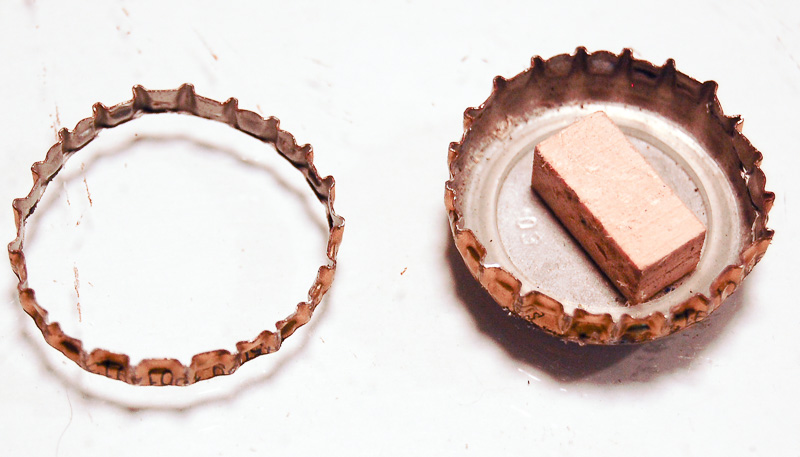 When two bottle caps have been so prepared, a notch for the pole is filed in the lip and they can then be joined back to back using a wood or styrene filler piece. The seam between the halves can be covered with a strip of styrene or filled with putty or both. For lettering I used dry transfers, as I don’t as yet have the capability of making my own decals. Learning to print decals will be yet another project. Never a shortage of things to learn and/or do in this hobby.