

Six Questions
For this article, I have used the term “informal operating systems” to differentiate less structured approaches from prototype-based operating systems. Steve King has used the term “fun run,” but I feel that term, while easily understandable, does an injustice to both approaches to operations. Those interested in prototype-based operations would not participate if they were not having “fun,” and those, who prefer a more relaxed experience, still want to learn about how the prototype does things. Consequently, I find the term “informal operating systems” more useful and less pejorative.
In Part 1 of this article, we learned that adopting an informal operating system does not always result in the relaxed experience desired. In Part 2, we want to figure out how to establish some basic organizing principles for informal operating sessions and then find ways to communicate those principles to crews (in order to give them the information they need to do their jobs).
Basic organization: To avoid chaotic situations, any operating system must have some basic level of organization; however, the effort to organize operations can seem quite formidable, full of big issues to be addressed – kind of like the big task of getting a coal drag up a steep hill without helpers. I would like to make some suggestions to make that process a bit less intimidating.
First, remember model railroading is not a matter of life and death; it is our hobby. A layout can still be fun even if the operating system is not organized as completely as we might want it to be.
Second, getting organized is a process. I suggest you take it one step at a time: try decisions out, see what works (or doesn’t), make adjustments, and move forward from there. (Repeat as necessary.) If you do that, you will find yourself less intimidated. (Remember friends can also help you see things from a different perspective.)
How do we figure out what step to tackle first? My suggestion is to start with a series of six fairly straight-forward questions that focus on the trains you want to run. This approach sidesteps big issues such as the railroad’s purpose, goals and objectives for sessions; an appropriate level of traffic management; a sense of time as it relates to the session; and a system of car forwarding. Once you get operating, ways to address those issues are likely to reveal themselves.
The following is a sort of Abbott and Costello list of questions. (Remember “Who’s on first?”) Hopefully, this list is a bit less crazy.
- Why does this train run?
- Who runs this train?
- Where does this train run?
- When does this train run?
- How do you run this train, and how do you coordinate its work with the work of other trains?
- What happens to the cars in this train?
How can you come up with answers? Before you actually ask the six questions, what process will you use to find the answers? First, it is best not to concentrate on possible consequences of your answers. Remember you don’t have to get the “right” answer the first time. Second, you do not even have to come up with your own answers. Through the years, model railroaders have developed numerous ideas for addressing these matters; you do not have to reinvent the wheel. Let us take a quick look at some ways you can find possible answers:
- Research: You can learn what the prototype and other modelers have done from reading articles in model magazines. I recommend articles about both model and prototype operations. Learn how modelers and prototype railroads have dealt with these questions. Some of the articles may be useful; others not. Try out what seems best. Note that this research may result in your reading articles advocating more formal prototype-based operating systems than you are looking for if you are considering informal systems. Read some of those articles anyway to get a good idea of the organizational issues prototypes and other modelers have dealt with.
- Your operating experiences and preferences: What have you experienced in sessions on other people’s railroads? What did you like (and wish to include in your system)? What did you not like (and wish to avoid)?
- Your crews’ experiences and preferences: Talk with the people most likely to be crew members, and find out what they prefer. Take that information into account, but do not let it override your ultimate goals and objectives for operating sessions. (SMD member Don Florwick began operating with a crew who preferred informal sessions, but that wasn’t what he had envisioned for his railroad. He used those informal sessions to work out the bugs and then moved on to a more formal TT/TO system.)
Once you have some tentative, first answers using steps A – C, you can then move on to steps D and E. Remember that finding answers is a process; so don’t be frustrated if your first efforts prove unworkable. Set unworkable answers aside, and try again.
- Trial and error/beta testing: Start using the rough answers you have. Be patient. (SMD members Pete and Jane Clarke spent years operating their HOn3 East Broad Top, constantly refining their system, until they arrived at the system they use today.) Do not be afraid to make changes to correct things that are not accomplishing what you want.
- Feedback from your crews: Remember they have different expectations and experiences from yours. Take advantage of that fact as you refine your answers (and eventually your operating system).
Elaborating on the six questions: Now, let us look at the questions again in more detail, and figure out how to find answers and communicate them to your crews.
- Why does this train run? What is its purpose? What does it do? What customer(s) does it serve? Since your railroad is different from everyone else’s, the trains you run will be unique in some way. Each of those trains has its own special role in developing the overall concept of your railroad’s purpose and the operating session’s goals and objectives. Answering the “why” questions will also give you an idea of how this train fits your railroad’s overall scheme.
Once you have determined each train’s purpose, the best way to share that purpose with the crew is with a brief train description at the beginning of the train instructions. A sentence or two should suffice – something short enough for the crew to read before beginning their run. (Remember the hubbub that accompanies the start of every operation session).
- Who runs this train? This is a two-pronged question.
- Was the layout designed for one/two operators or for a large group? The answers lie in the design of your layout: for instance, the size and capacity of the aisles, the kind of railroad, the number and spacing of towns served, and the expected number of trains to be run in a session. After you have answered these questions, you can use those answers to determine how many crew members you need for your sessions and how many you can accommodate.
- Once the crews arrive, who gets assigned to a specific train (or job)? Will you assign by arrival order (first there gets first choice), by experience (such as assigning veterans to dispatching and yard master positions), by sign-up sheet, etc? You have to decide and let your crew know in your orientation briefing.
- Where does this train run? Where does it start from; where does it terminate? Where does the train have to go in order to do its job? Where does it interact with other trains? Your answers to the “why” question will point you in the direction of answers to these “where” questions. After you figure out answers for one train, move onto the second, third, and so on. Since this question relates to the “when” question, you may have to revise the answers later on.
For crews, “where” questions should be addressed briefly in the train description (especially where the train originates, works, has meets, and terminates). Somewhat more detailed answers can then be provided in the body of the train instructions. (Remember, at the beginning of the session, it is best to keep the amount of required reading minimal.) Additionally, crews need help orienting where they are within the layout room. They need schematic layout diagrams/maps (giving place names and yard locations along the main line), location signs at those places, as well as more detailed diagrams/maps indicating where specific tracks and industries are. It is crucial that the names of these places be consistent with names used in paperwork.
- When does this train run? For informal operating systems, time is perhaps the most complicated question because getting away from the pressures of time is one of the main reasons for taking the informal approach in the first place. Unfortunately, you have to address the time question. Easy prototype-based answers like clocks and timetables are likely to be too formal for you and your crews; so you must come up with a way to determine when a train should be on a given track. (Otherwise, collisions will happen.)
To do so, you will probably need some sort of rough schedule. That can be developed before regular sessions begin and later reflected in the instructions given to crews. (They may not ever need to consult the schedule.) To develop a rough schedule, you should start by making a list of trains in the chronological order you want them to run. Then, you will need to find out how long it takes to run each train in order to figure out when and, consequently, where that train will meet other trains. These are trial and error investigations that you can make before regular operating sessions begin. (Be aware that there may be more stress than desirable during this testing period, but keep in mind that you are trying to find ways to eliminate that stress when you move on to your regular sessions.)
Over the years, we model railroaders have come up with quite a few ways to address the time issue without going to the lengths to which the prototype goes. Among the options we have tried are verbal authorization (mother, may I? sessions), sequence schedules (trains in chronological order), operating scripts (think of Frank Ellison’s comparison of operating sessions with scripts for plays), and train instructions. Some of these work better than others as discussed in Part 1. (Regardless,, there are numerous options to choose from. I plan to discuss some of them in future articles.) To my way of thinking, how you answer the time question is crucial if you want to develop a relaxing, informal operating system for your railroad.
Your best way to give crews time-related information will be the detailed train instructions (following the initial description of why and where the train is run). Be clear and complete. Remember crews won’t see the schedule.
- How do you run this train, and how do you coordinate its work with the work of other trains? Start by focusing on each train separately. Figure out how it should do what it is supposed to do. Then factor in how the operation of other trains will affect the one you are considering and make adjustments. Beta testing and trial & error are good ways to develop detailed, coordinated answers for these questions. Again, detailed train instructions are the informal way to communicate this information to crews.
For crews, “how” becomes a two part question:
- How a crew runs this train is best conveyed by the train instructions. The level of detail in the instructions relates to the kind of session you want: one that expects train crews to read lengthy, instructions with lots of rules to follow or one that is more relaxed and open. Bulleted directions, grouped under headings for each of the places where events happen, are one way to simplify train instructions and to make them easier to read one at a time.
- How a crew coordinates its train’s work with the work of other trains relates to the places (where) and times (when) trains must interact with each other: passes, meets, and multiple trains working in the same location. You want crews to have a basic familiarity with what is happening during the session (especially as it relates to their train) without having to consult a complicated timetable. Again, good train instructions can provide sufficient information and clear up any required matters of train superiority. Unexpected situations can then be handled by train orders (verbal or written).
- What happens to the cars in this train? Clearly, you will need some sort of car forwarding system. We model railroaders have quite a few of these from which to choose: car cards and waybills, switch lists, color-coded tacks, car-for-car exchanges, etc. Based on your experience and preferences, choose the one that seems best suited to what your railroad does, then try it, and see how it works. Try another system if the first does not work out. Revise as necessary.
For some kinds of traffic (passenger trains and unit trains, for instance), train instructions alone may serve; however, for general freight traffic, you will likely need a more detailed system giving crews specific directions about where to spot and pick up cars as they run their trains. In setting up a more detailed system, try to keep the information you give crews as brief as possible: type of car, reporting marks, number, and destination may be all the information they will need.
Conclusion: The questions I have suggested are one way to focus on the trains you wish to run and to use those trains as a start to organizing the larger operating system for your railroad. As I said earlier, this approach sidesteps the big issues, but beginning to operate is likely to reveal ways to address those issues.
One important thing to note about the process of answering these questions is that the answers you come up with do not necessarily have to be shared in their totality with your crews – for instance, the rough schedule you developed to answer the “when” question. Your crews probably will not need to refer to that schedule during the actual session – especially if they have train instructions telling them when and where to meet other trains. In other words, your railroad can have a whole layer of “complicated organization” of which your crews can remain blissfully unaware.
With these questions spelled out, we have come to the end of this article and, hopefully the beginning of your quest for the operating system that is right for your railroad. What we have discovered is that setting up an informal operating system is a bit more complicated than we might have imagined. We have realized that just because we want to run trains in a relaxed fashion, we still have to address some basic organizational questions in order to give crews the information they need to get their “jobs” done. The prototype had to answer these questions; so do we. Your goals may be different from the prototype’s, but by answering these questions, you can develop enjoyable, relaxing sessions for your crews (and in the process, give them opportunities to experience and learn more about what prototype railroads do). You want your crews to operate in a calm, “professional,” capable, and relaxed manner.
If you decide an informal operating system is right for you, you will probably want to know about specific alternatives to prototype procedures. Some of these alternatives may not be widely known. For instance, you may have experienced the often chaotic “Mother, may I?” type of session and want a more “professional” type of session. (In this case, perhaps, a “dispatcher, may I?” approach will work better.) Or you may be familiar with formal train orders (prototype-based), but not aware of fill-in-the-blank train orders (more informal).
 Don’t forget to catch the next addition of NMRA-X this Saturday, May 30th for 12 hours of live content! Below is the schedule in EDT. Please adjust the times according to your own time zone.


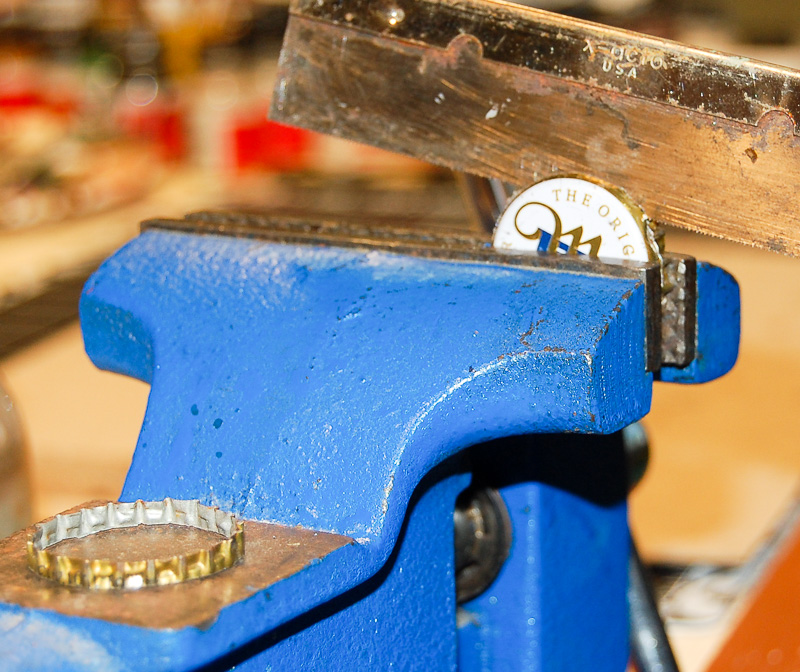 As the pics show, the knurled apron of the cap can be sawn off in a vise. It is necessary though to put a spacer within the cap in order not to pinch the saw blade. The cap must be rotated as one cuts through it so as not to cut into the spacer.
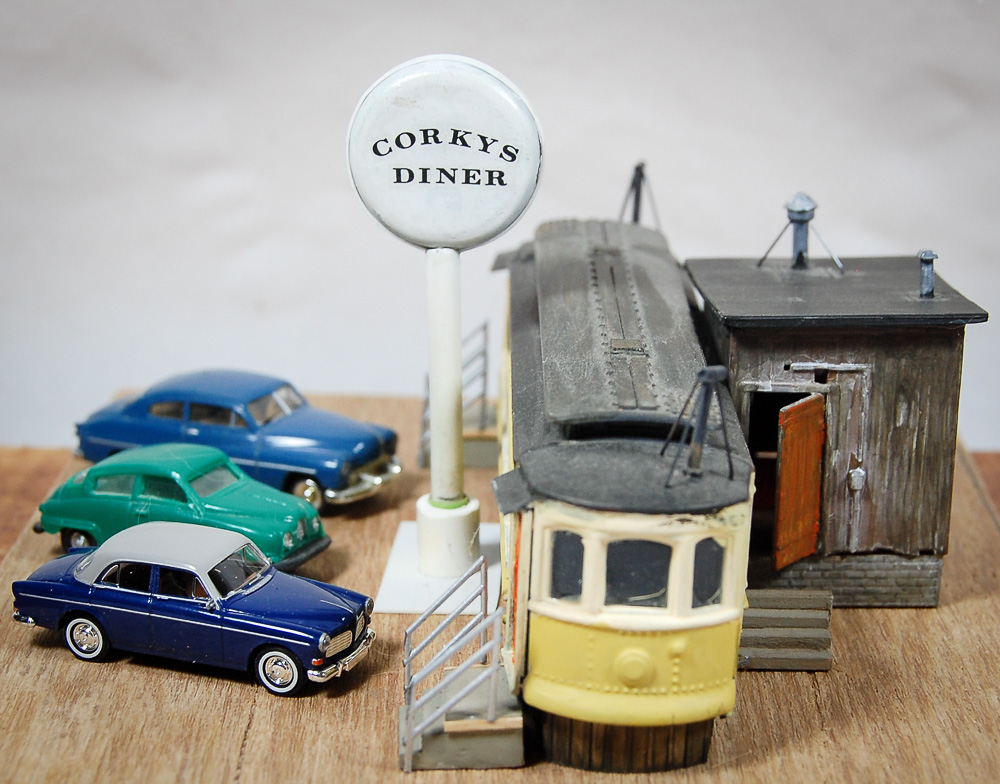
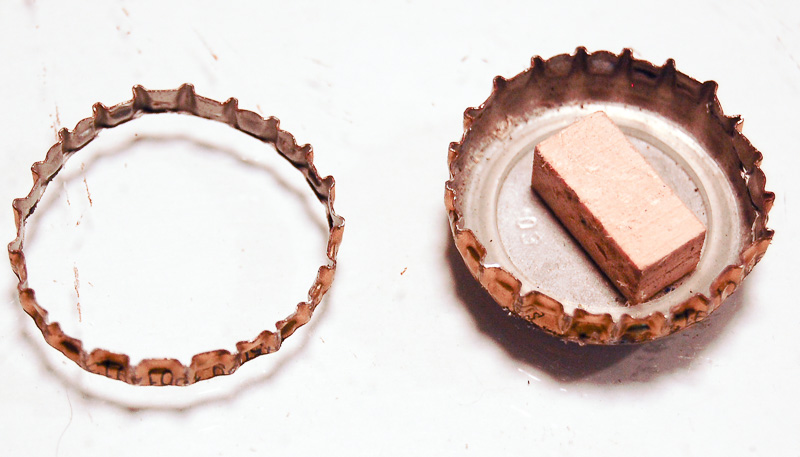 When two bottle caps have been so prepared, a notch for the pole is filed in the lip and they can then be joined back to back using a wood or styrene filler piece. The seam between the halves can be covered with a strip of styrene or filled with putty or both. For lettering I used dry transfers, as I don’t as yet have the capability of making my own decals. Learning to print decals will be yet another project. Never a shortage of things to learn and/or do in this hobby.