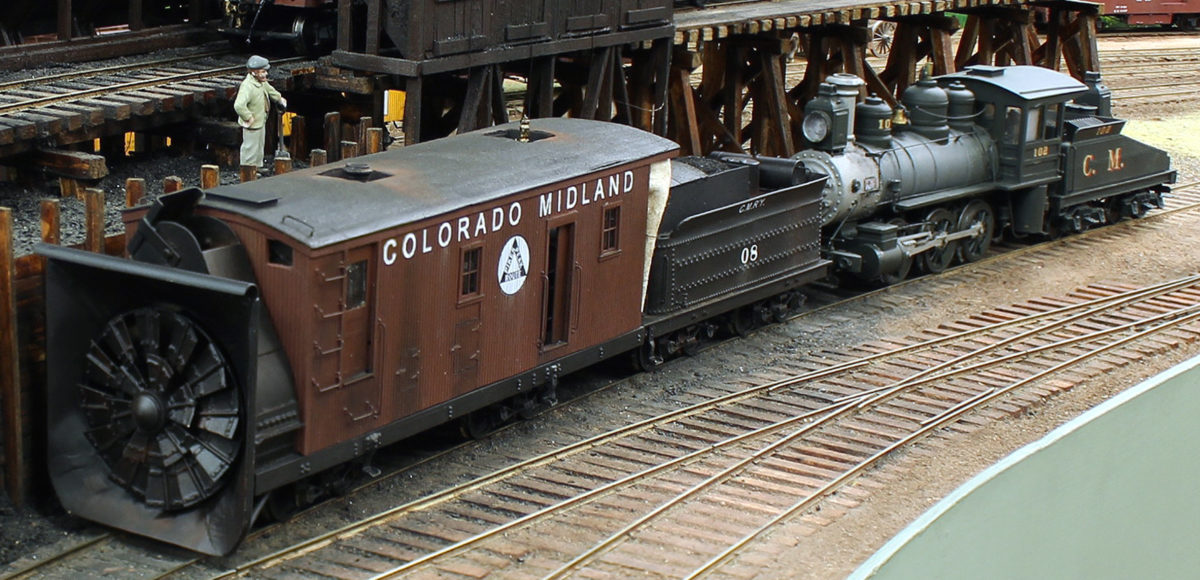
In 1888 the Colorado Midland Railroad bought a rotary snowplow from the Leslie Company. The original plow had a nine-foot rotary blade with a shroud 11 feet across that would clear a path wide enough for any Midland equipment. One of the more interesting aspects of the Leslie plow was the car body, which resembled a “greenhouse.” There was a crew area directly behind the blade and impeller wheel for the operators who had a full view out the front and sides thanks to all the windows. The body of the machine covering the steam engine to power the rotary was also lined with windows. One can only imagine all the broken glass that had to be repaired each winter
After a number of years in operation, the Midland decided to rebuild the body of their only rotary snowplow. In 1895 the railway’s shop converted the body of the machine to a more conventional and durable design, which included a minimal number of windows. The plow was numbered “08” until 1900 when the Midland bought a larger 11-foot bladed machine from the Schenectady Locomotive Company. The Leslie plow was renamed “Rotary A” and the new machine was designated “Rotary B,” and both machines survived until abandonment in 1918. The Midland Terminal Railway bought the Leslie machine in 1921, and it served that rail line until its demise in 1949.
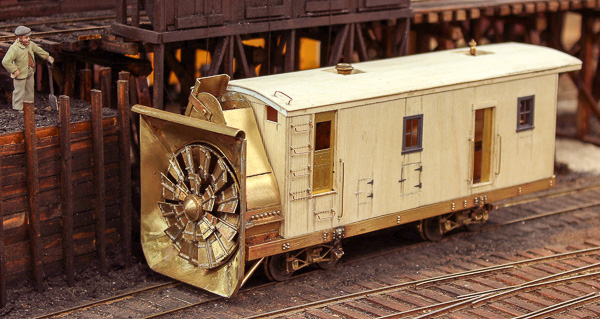
The model represents the Colorado Midland’s Leslie snowplow after its rebuilding in 1895.Everything on the modeled snowplow is scratch built from sheet brass and bar stock, sheet wood for the sides, and castings for the window and truck side frames.
The front truck of the plow does not include brake shoes due to the accumulation of snow and ice as the machine fought its way through snow drifts that sometime were higher than the machine.
The rear truck does include brake shoes so there is some way to help stop the plow. The roof is made up of individual six inch wide boards covered in tissue paper with holes in the roof for the smoke stack and the steam dome with its relief valves and whistle. (Building the tender is the next order of business.)
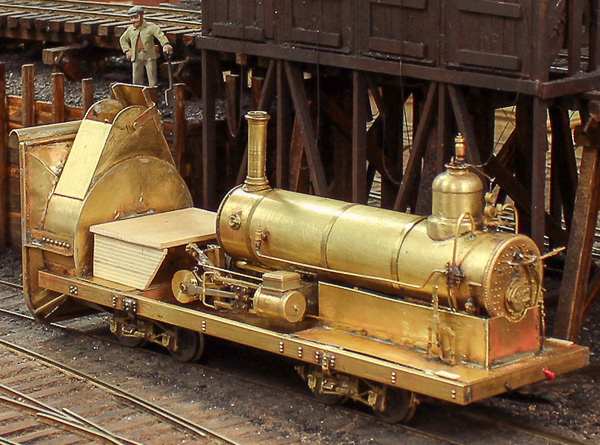
Looking at the model from the rear with the car body removed, one can see all the workings that make the blade turn. (There is a motor under the boiler and all the mechanisms work, even producing a breeze out the exhaust chute.) While some detail work remains, the wood platform is for the operator to supervise the movement and speed of the plowing operation.He is also, and equally important, tasked with the responsibility to set the exhaust shroud for throwing the snow out to the left or right side of the train. The cylinders are set in a reverse position so they can power the blade through a set of gears. Due to blowing snow, shrouding had to be used to surround most of the boiler and the firebox to keep the working area as clean as possible. It would take at least a two-man crew to operate the boiler with its “Johnson Bar,” injectors, and to shovel coal. But, one of the most important jobs would be to operate the whistle, which was the means of communications between the plow operator up front and the crews in the four or five locomotives pushing from behind the snowplow’s tender.
Editor’s Note – This is part two in a series of posts from Bob describing the history and construction of his layout. Read part one here.
I had been in the business of restoring old homes in Upstate New York where I also attempted to convince the town fathers to establish an historic district to no avail. Nonetheless, this gave me a lot of background in architecture and “city scape.” Buildings like people evolve, undergoing all sorts of modifications during their existence. One of my favorite evolutions was what I came to call “Art Deco on the cheap.” It was ideal for my tumble-down Victorian city in the Depression. Real Art Deco was very expensive for the times but the Victorian style had become passé by then and store owners were looking to modernize but didn’t have much to spend. The style ran from the 1920’s to 1959. Art Deco was called “Futuristic” at the time everything was focused on streamlining hence another reason I love the GG1’s which was one of the first streamlined electric locomotives.
With observation and ingenuity, you can find all sorts of stuff to do “Art Deco on the cheap” from candy wrappers to fancy box ribbons. The bulkheads below store windows were clad with checkered tiles. A “Chock Full of Nuts” bag supplied that detail for me. Aluminum, because it was a new metal at that time, was used extensively for streamlined awnings on store entranceways. Old classical architectural items were painted in aluminum paint.I found that the shiny metallic covers from toothpaste boxes gave the same effect as neon lighting if cut into fine strips. I added them along the entranceways of my commercial buildings. It even works to make signage appear as if it is lighted. Certain paint colors were associated with the Art Deco. I painted a diner converted from an old dinning car rose and sand which was one of the Art Deco color combinations. These Art Deco modifications hung around through the 1950’s and even long after, so they are good details for many layout eras.
Two events were to follow in close session that would change everything in our lives, and for the best. In August of 2003, there was a power blackout of the entire Northeast that terminated in New York City. The ultimate result was that the federal government reversed itself on deregulating the utility industry. A few months later a coworker alerted Betty that he had seen position openings for power engineers with the Office of Electric Reliability for the Federal Energy Regulatory Commission (FERC) in Washington. It would be well over a year before Betty got a response to her application. During that time, Betty suffered and ankle injury. This was an unfortunate time for her, but for me it meant I could begin construction on my railroad in Frederick. A layout at last! Then, that winter, Betty was hired by FERC which allowed us to return to Frederick, MD.
As construction progressed, I learn my first lesson in layout construction. I did not know how much space the curving masonite back drop would take up.In the end it threw my track plan off by three inches. So I had to extend the framing out into the passageway. This was not fatal. But I would warn those who want to attempt a small layout to plan the layout after having set in the backdrop. Also, I covered the masonite with wallpaper liner. This reduced the number of visible seams down to one. My intention is to expand my layout into an adjoining room that is now my workshop. I will not do any track planning until after having done the roadbed and the backdrop especially since this oddly shaped room will require many bends to the masonite.
Nonetheless, I did have a serendipitous finding as a result of this experience. Because of the need for the three-inch extension, having to allow for enough space for people to filter into the passageway from the stairway, I could not have a 90-degree angle. Therefor I had to create a 45-degree angle “wing.” This offered several benefits. First, it gave me more precious modeling space to use backdrop buildings. In fact, I was so happy with this, that I did the same thing at the other end of the layout. The result was that when a viewer stands in the passageway/viewing area they are given the impression of looking out into the layout (i.e. like a 300-degree viewing) as if they are seeing an entire world.
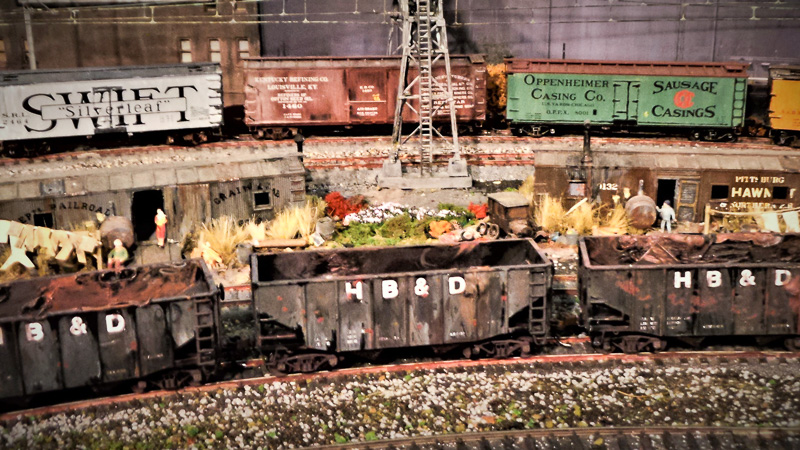
I did not want my layout to be just a “steelworks railroad.” My real concern was for telling the story of the people of the Depression era. Quoting Dickens, “It was the best of times, it was the worst of times…”The Hellfire, Brimstone, and Damnation is an aged railroad on hard times trying to get by with old equipment. GG1s represent the modernism of the futuristic streamline and electric age.That was the essence of the period. Or as I like to say, the Pennsylvania Railroad was the “Standard Railroad of America” and the HB&D had no standards at all! I go to some lengths to display this.
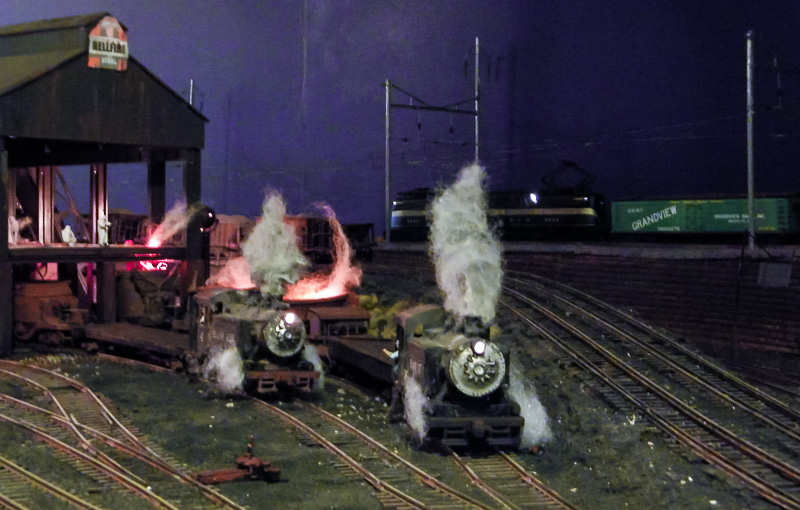
HB&D shops.
The HB&D shops (above) and service area are littered with junk. There are marshy pools of water with cattails because no one is filling these depressions. There are junk and old ties thrown into the pools. The locomotives are heavily weathered and battered. The roundhouse roof is beginning to fall in on one side.
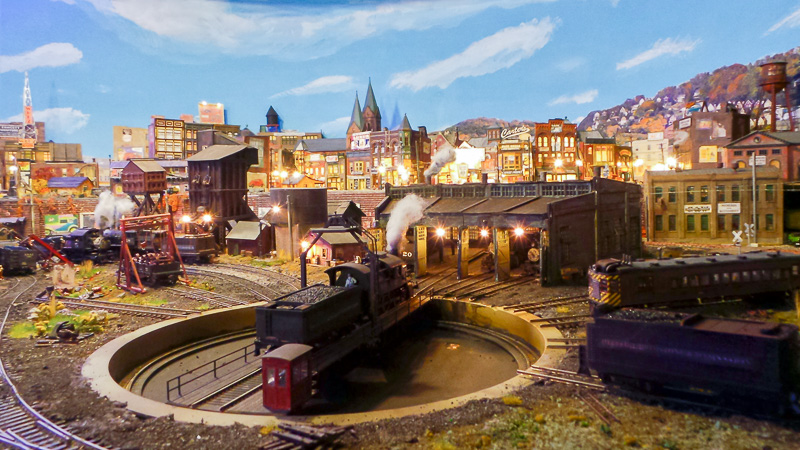
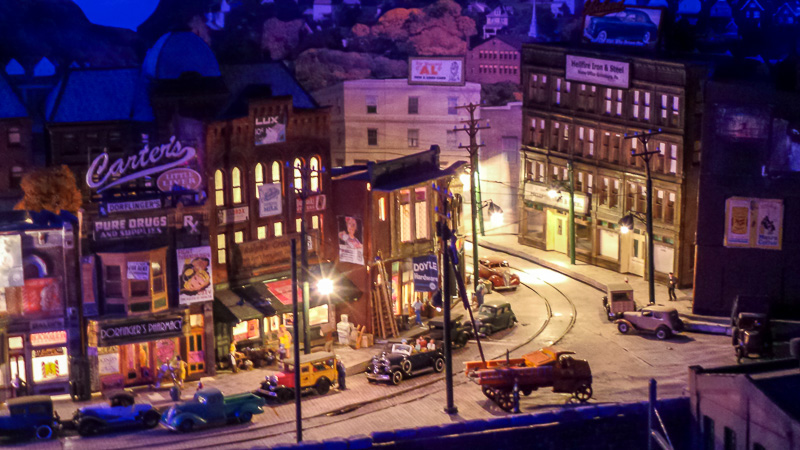
City scape.
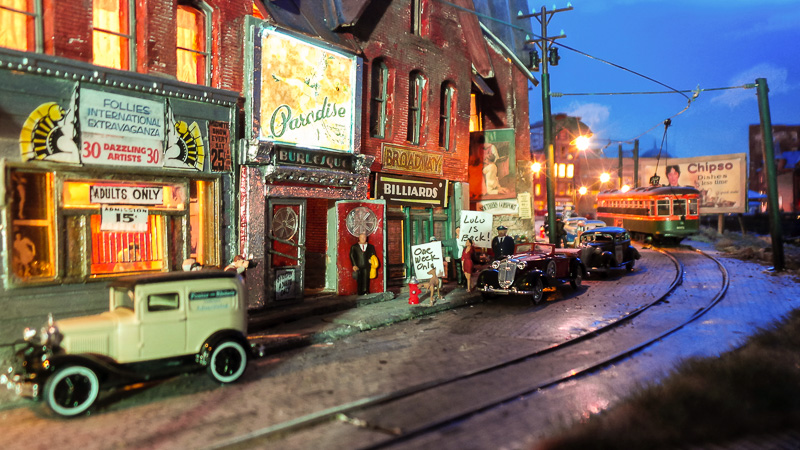
The city is my favorite creation. Creating a “tunnel” as staging gave me much more space to create the city scape (above) that I had hoped for. It even provided enough room to run a trolley loop through the city. Most of all, it allowed me to crate the depth of field that makes the city look realistic to the viewer. Using fore-shorting and paper backdrops allowed me to create what looks like a full-scale city with municipal buildings, churches, stores and offices all in a very small space. I even cut out paper buildings to paste onto the paper backdrop along with advertising signs to make it appear to the viewer that they are able to see many blocks into the interior of the city. All the buildings contain as much detail as possible such as people, window curtains, lights, street lights and so on even though it might seem unnecessary. It is the richness of detail that makes the scene seem more authentic. Everything is lighted. Seen in the dark with all the hundreds of lights brings a magic to the city. I even created my own street light/trolley poles based upon a prototype found in a photo.
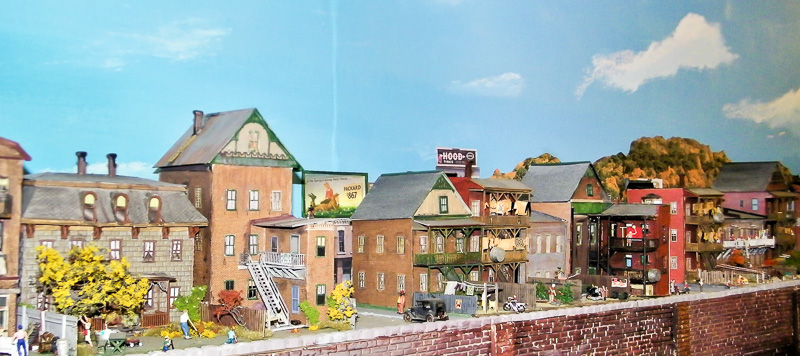
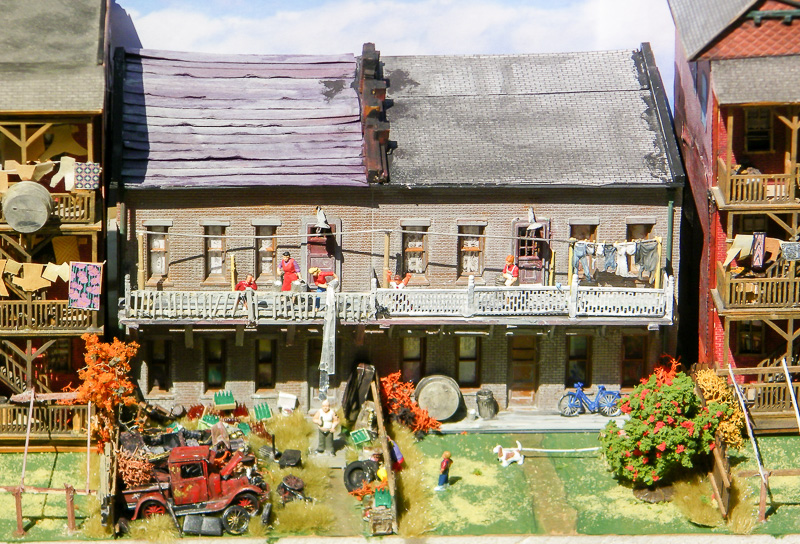
Tenements.
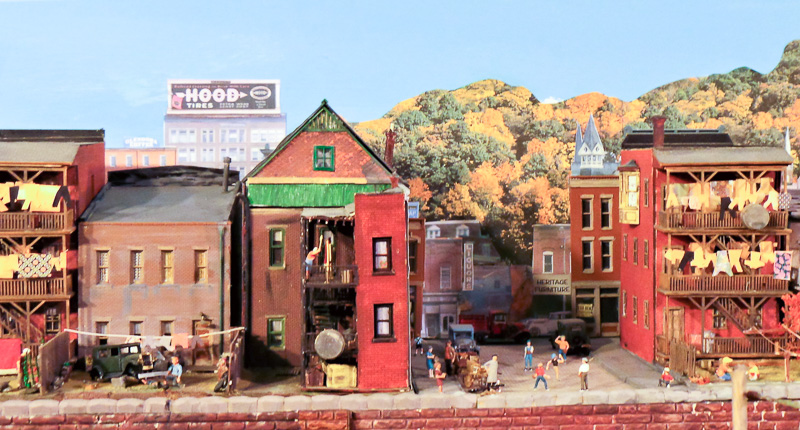
Once this realism is established in the mind of the viewer, their “mind’s eye” is deceived enough to continue on to the tenement scene and continue to believe that the city continues on much farther. Yet it is less than a foot deep.
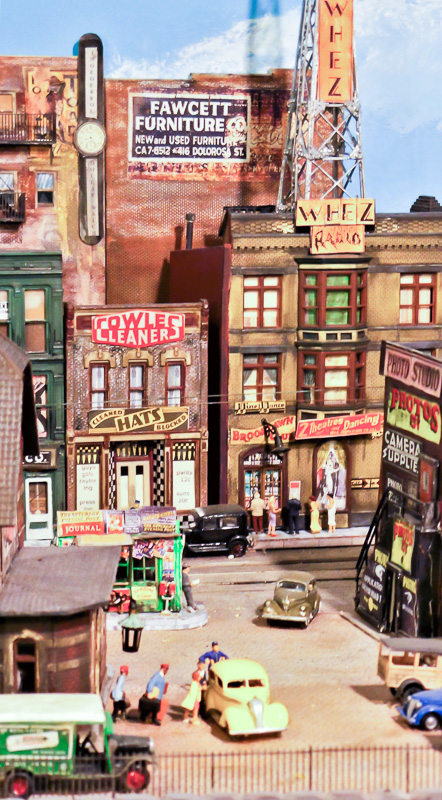
WHEZ.
“The best of times, worst of times” theme is carried on in many mini-scenes. For people who had had a steady income in the professional classes, it was the best of times. Money went very far for those who had it. At the train station a young woman is returning from a shopping trip to New York on the electrified Pennsylvania Railroad. She is followed by a platoon of porters to the taxi with her packages. Meanwhile, across the street at the Brooklawn Night Club, well dressed customers are about to enter for an extravagant night of entertainment. For those unable to afford the steep price of admission, WHEZ radio would broadcast the proceedings from the transmission station on the second floor and tower on the roof.
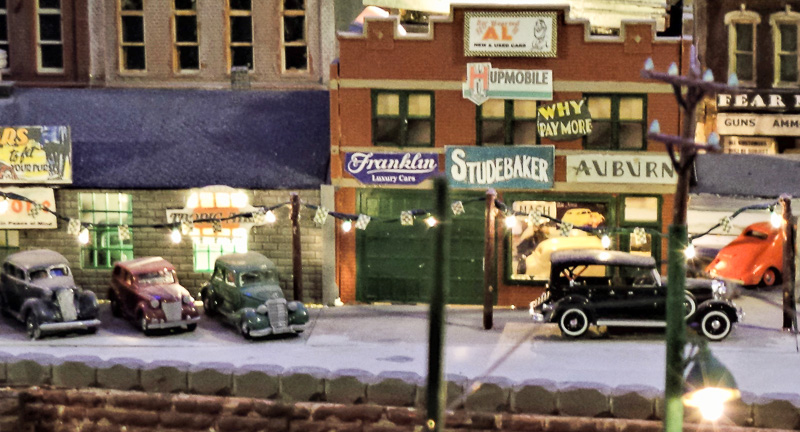
Big Hearted Al’s.
At Big Hearted Al’s car dealership which specializes in luxury vehicles, a customer is greeted by a salesman.
Of course, the “worst of times” is well represented. Across the bridge and down the street is a “tourist home.” This scene actually based upon a story told to me by my mother. After finishing college in 1929, (not a good year) she could not find a job so she had to return home to help her mother who was ill. This required going to a nearby grocery store located a few blocks away and was actually located underneath a railroad viaduct. Found by the tracks was a “tourist home,” but from all the women sitting on the porch, she knew it was for another kind of tourism. But what saddened her was that she recognized many girls she had gone to high school with.
Brothels served many secondary services as well: most of all, a man could come just to take a bath for a small fee or just socialize with the women.
Even before the Depression there were few job opportunities for women. With the Depression the situation became a disaster. Marriage engagements were broken off because the couple could not support themselves.Men were forced to leave their wives to follow the hobo trail to find work and often were not heard from again.Parents were often driven to “throw out” their older children from the family (both boys and girls) to care for the younger ones.Prostitution became the only “plan B” for many women.Brothels were run by “madams” or pimps who took all the money and only provided room and board.It was actually a form of slavery.Yet even this was preferable to the fate of older and less attractive women who worked and slept on the streets.
Paradise Burlesque.
The Paradise Burlesque was a preferable place to work for women.Performers were on stage away from the men and protected by bouncers. Nonetheless, men with sufficient cash could “date” a dancer. The scene in front of the burlesque house was based upon an actual photo taken during the depression.Even the burlesque houses were finding it difficult to attract patrons in the Depression.They actually had to resort to print advertising; usually of a popular performer in front of an elegant car.
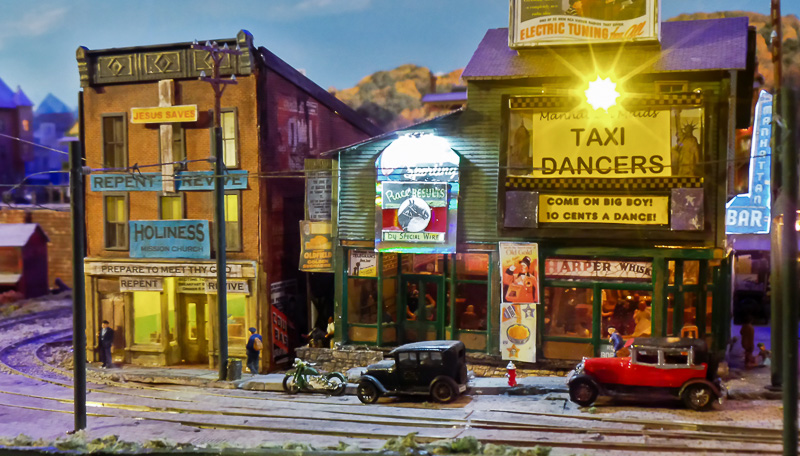
Taxi Dancers.
Likewise Taxi Dancers would dance with men for 10 cents for a three-minute dance (actually a high fee in those days). They could choose to take their partners upstairs or not but there wasn’t a lot of choice. Poverty can do that. For the price of a watered-down drink, a man could just socialize with a pretty girl. Unattached men were desperate for just the simple company of women.
Horse racing parlors were illegal in most states yet betting parlors often flourished in the open.Bets were placed on horses running at races at race tracks outside the city and the results were “wired” in. It was all too easy to scam customers with false reports. The movie The Sting portrays this. The red-light districts flourished even in the most conservative of towns because of the power of the “mob” to buy police and political protection and simply because municipalities were forced to lay off policemen.Priorities had to be placed on more serious crimes. The hang outs of the “mob” was most often in poolrooms and bars.
Liquor had been legalized in 1933, nonetheless “bathtub gin” was not down and out. Hooch was available in liquor stores “under the counter.” As it was untaxed, it was much cheaper but often unsafe.Alcoholism was rife as was drug addiction. In the side alleys and back lots of my layout you can find men passed out and nodding off.
Mission Societies were established by “respectable citizens” to “revive” the drunkard.If a man was willing to put up with a sermon patronizing him as a “lazy bum” for not being employed, he could get a “hot and a cot.”Experienced Bo’s shunned such places but the intermittently unemployed knew to watch outside for the sermon to end and then filter in behind the congregation when it was over to the soup kitchen in back and flop house above.
Boxcar shanties.
During the Depression, many railroads went out of business.When a derailment occurred, cars from out of business rail lines were simply abandoned at the trackside. People quickly took advantage of these to make homes.There were small “towns” of these throughout America.
The tenement dwellers on my layout are having a good day. The wind is blowing the factory smoke away from the slums.Women are setting their wash out to dry so it won’t get sooty. In fact, the name for my city is Grimesburg. This is actually based upon a personal experience: I had an aunt and uncle who lived in Pittsburg. One Sunday I was waiting for the old folks to come down to the car and got bored. I leaned up against the wall of the house. When they finally came out, all the women exclaimed at the grime on the back of my shirt. I said that “Pittsburgh should be called Grimesburg.” This became a joke for a day or so: hence the name for my town.
Children playing.
There are a host of mini-scenes in the tenements: children playing in the back yards, guys repairing an old Essex, women haggling with street vendors for potatoes and secondhand clothes and neighbors gossiping and arguing.
Water on Mr. Beer.
The first photo of mine to appear in the Walthers catalog was of a woman pouring water on the head of an old slob who keeps his yard in a total mess while the neighbors next door keeps theirs very properly. This was based upon personal experiences we had with a neighbor years ago. We would have liked to throw a bucket of dirty water on his head. It was one of my first models and submitted long before I actually had a layout.
The tenement districts not only consisted of apartments rented out to families but also single room occupancy hotels and boarding houses.Boarding houses could be nice homes or more often in the Depression, a group of older women would combine their resources to buy or lease an old building. They would offer breakfast and dinner and a bed. This bed would be one among many beds that could be fit into a room and sometimes a hall.No matter which accommodation you had, sleeping could be a challenge. Roommates snored, bed springs creaked, and fleas and bed bugs were not uncommon. But to catch up on a night’s missed sleep, or for emergency sleeping accommodations there was an unusual option: the “second run” movie theaters.
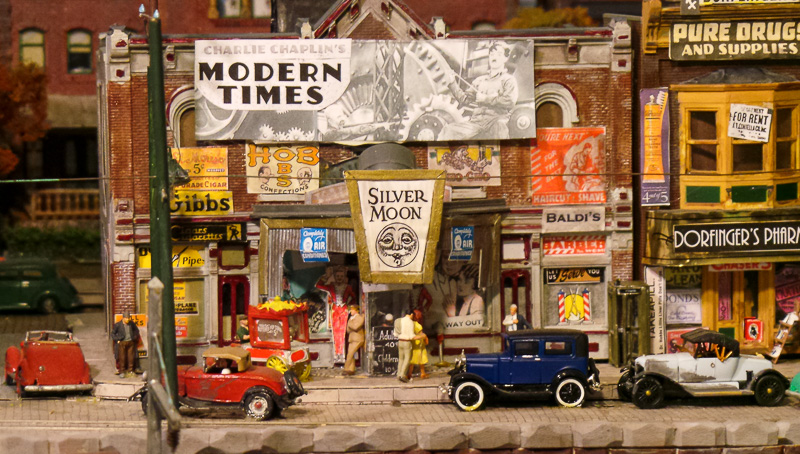
Theatre.
Second run movie theaters were not the “movie palaces” of the 1920’s. These were old vaudeville theaters that had gone to seed. With the simple addition of a movie projector and screen, these theaters offered popular movies that had already appeared in the better theaters. This offered cheap entertainment to the less well off. These theaters were open at least 12 hours a day and often for 24. They also had bathrooms, cheap snacks and heat in the winter and most of all; air conditioning in the summer.The “air conditioning” often was nothing more than fans blowing over blocks of ice, but it worked. People flocked to such places in the summer. For a small entrance fee, you could stay there for as long as they were open.
Nothing “dates” a layout more than signs and automobiles. I am very proud of my collection of both, especially the signs.Signs for the 30’s era are hard to come by. Some came from photos of the depression which Betty manipulated on the computer for colorization. Others I found at historic sites or museums. I took pictures and reduced them down on the copier. Some I found still extant on buildings especially in old industrial towns. In Scranton and Schenectady, I found quite a few. Some of those I collected have recently come available in the Walthers catalog which annoys me when I consider the work I went through to find them.
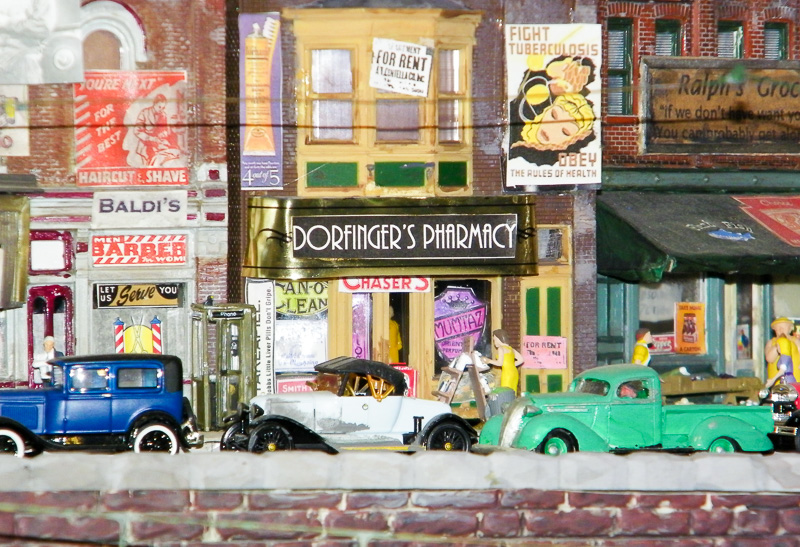
TB sign.
Photos show that signage got completely out of control in the Depression. Laid off workers started concocting all sorts of snacks, candy, sodas, and silly inventions they hoped would become popular and earn them a living. They would have advertising signs printed up, then locate some unemployed worker, provide him with a bucket of paste and a brush and send him off in the dark of night to plaster the signs on any available space. The signage would literally appear “overnight.” Signs were plastered over other signs. Signs grew bigger. Billboards started to spring up like mushrooms.
If all that were not enough, the New Deal got into the sign mania also with all sorts of posters dealing with such things as public health issues. Signs warning about venereal diseases and tuberculosis which were rampant during the Depression, were everywhere. They also had signs about using libraries to educate one’s self. There were signs about the importance of thrift, cleanliness, sending kids to school—you name it.
Some signs are of my own creation for a bit of humor utilizing Art Décor elements such as: Big Hearted Al’s New and Used Cars and Blind Faith real estate. In fact, Blind Faith Real Estate was an actual agency located in the Koreatown area of Manhattan. My luckiest find of all in signage, was finding the advertising banner that were given out to theaters to put above the marquee for Charlie Chaplin’s Modern Times. This film was released in 1936—just perfect for a second run theater in 1937.
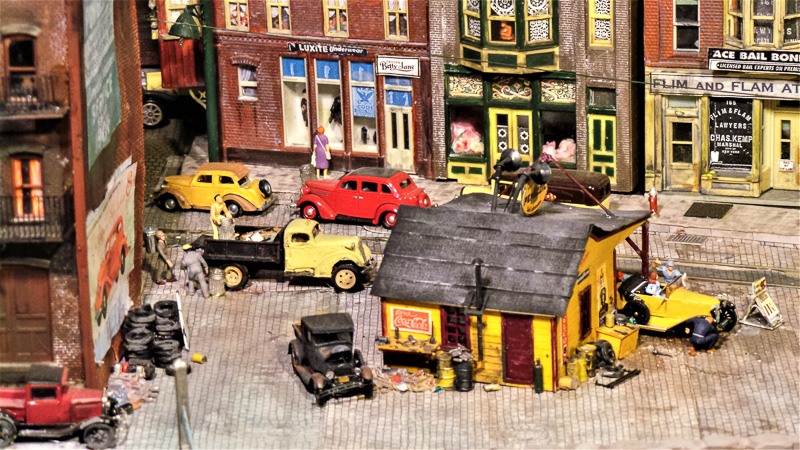
After 1929, people held onto their automobiles for as long as they could. Therefor most of the cars found in photos from the era show 20’s automobiles. From the photos of the past it, was apparent I was going to need LOTS of cars to make an authentic 1930’s urban scene. Jorden supplied many of my models and sometimes some good ready-made ones became available. I even located some German cars that were very close in body type to 20’s and 30’s American Cars.Sylvan offered some fine 1930’s car kits but they have only recently offered cars from the 20’s. There were over 400 auto makers before 1929.Fortunately for me, their body styling was pretty much alike.With some ingenuity, I was able to customize the Jordan kits which were mostly Fords to bring some variety to my “car scape”.We had a kid next door who I used to call “Count Count.” When I invited him to visit my layout, he came up with 87 cars.I have added quite a few more since then.
Many people have the mistaken idea that all old cars were black. This was because they appeared black in the old photos but in reality, they came in all sorts of colors and were often two-toned, unlike what is available today.Therefor painting cars in different colors was the easiest way to customize. Also putting spare tires in different places helped and where possible, I exchanged grill work from one car kit to another.
Roads.
The condition of the roads in the Depression became a big political issue largely due to the car makers and AAA. In the cities, streets were cobblestone but at the city limits, the roads were just dirt. This required that cars have very large wheels to get through the muck. Carmakers wanted to streamline cars (there’s that word again). This meant smaller wheels. With the New Deal carmakers and road builders were in the vanguard lobbying for “make work” projects to pave roads. These roads were often made of unreinforced concrete which quickly heaved and cracked, nonetheless this was a big improvement from the past. For me, this meant that there was nothing available to model these roads. I created my own (below) by utilizing cardboard painted grey and marking in the black caulk in the joints and then using a sharp pencil to make crack lines. I deliberately set the cardboard patches down to look a bit wonky and added fine strips of grass between the joints.
I have done my best in a small space to represent every aspect of steelmaking even if I had to use a paper pasted building in the background. However, my real goal was not so much to make a demonstration on steelmaking as to show the drama of steelmaking as I experienced it as a small boy. This required several lighting techniques. I used a passenger car lighting strip placed at the apex of the interior roof of the blast furnace to reflect down upon a strip of gold foil to which I glued smashed up orange glass donated by a friend who does stained glass work. This strip of foil and glass was placed within the floor channels of the blast house floor and extended beyond the channel about three inches to create a “slag fall” into the slag car.This was an experiment on my part and I was pleased to find that this nicely replicated a glowing stream of slag.
Next to create the glowing slag in the slag buggies, I used some thin orange plastic and cut circles to fit the bowls but did not secure the disks into the bowls at that point. I then drilled holes in the bottom of the bowls and then inserted an LED yellow light into the hole and secured it with electric tape. I did the same with the other car and then, once I determined the proper position of the car receiving the slag pour, I bored a hole through the layout, and brought down the wires of each car. The strip of gold foil and orange glass was cut to the proper length to fall properly into the bowl. Then the plastic orange disks were placed into the bowls of each car.
Steel mill.
To create the flashing effects of the oxygen lancing operation, I used a flashing welder light kit over which I overlaid some scraps of orange glass but left a hole for some of the white light of the bulb to come through as well. I tested this in a darkened room to determine if I had the desired effect and then poked the assembly to the rear of the furnace. I prepared a hole through the layout for the feed wires to pass through. I cut some strips of red glittery packaging from a toothpaste box and glued this to some silver foil from some cookie wrappers (we must all suffer for art) in alternating strips and then glued that to some scrap black plastic.This was then applied to an opposite wall in the furnace area to create reflection off of the modified welding kit. All the feed wires each of these lighting effects were then fastened to a terminal block under the layout which then of course, was fed to a transformer.
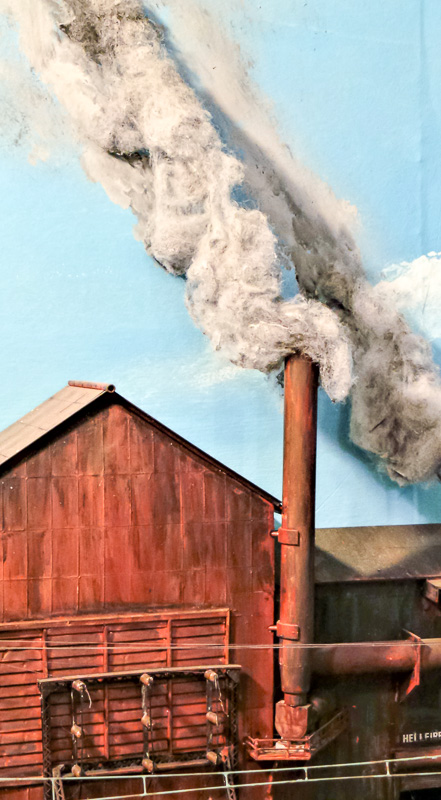
Chimney smoke.
I believe that any factory chimney without smoke is like a face without a nose.Creating smoke is quite easy:go to a fabric store and buy some hollow fill.This is used in quilting as filler. It is a polyester fiber.Cotton batting will not work. Find some spot where you can make a mess and hang out a string for drying. Some rubber gloves might be desirable for this. Using an old pan, mix up a slurry of grey paint (or black if you like).It should be fairly watery. Using a portion of your hollow fill, slosh it around in the slurry until it takes on the coloration.It will not come out evenly but that is desirable. Drain off the color slurry but don’t wring it out. Wringing will cause the fibers to mat making it difficult to work with later. Sling the mess over your string and hang it out to dry. You can also make a second batch with the leftover, thinned, slurry. On the next day fluff and stretch it around until you get an appearance of smoke.
For chimneys with larger openings I use a wine bottle cork glueing the hollow fill to the upper end. Some fine wires will be required to pass through the hollow fill smoke to be secured to the cork for the “smoke” to retain its desired position. Then place into the chimney.
For the steam coming out of the slag bowls, I tore off some shreds of the less darkened smoke into a feathered effect and glued it to the surface of the orange plastic disks and the edge of the bowls to make it seem wind-blown. For the locomotives, I twisted the fibers into a knot and placed glue on the knot and put it into the smoke stacks. For all these applications I can highly recommend Beacon Quick Grip glue sold at Walmart in their craft department.
For the steam being created by the oxygen lancing procedure, I had made a small amount of hollow fill in a light slurry of dusty yellow. This blast furnace scene was my second submission to be accepted into the Walthers catalog.
Coke oven.
My coking oven scene was accepted by Walthers the following year. The prototype for this came from a book on Republic Steel written, photographed and published by the company just before it closed in 1954. I doubt that things had changed much from the thirties. This book offered color photos.I had already planted the coke oven on my layout and had the quencher car set up, but I had always wondered how did the coke get out of the oven to the cars. The photo revealed that a small electric trolley would pull open an individual oven door. Somehow this triggered a simultaneous signal to a hydraulic pusher on the opposite side and the coke was pushed out. Afterward a small gas engine trolley would pull the quencher car to the quencher which was little more than a gigantic shower. More DRAMA for my railroad.
Much of this scene was made with scrap parts I had collected so I can’t really tell you fully how the trolleys were constructed but I got something pretty close to the prototype.I used some left-over posts from a Walthers chain link fence kit for the transmission cable and a fine strip of styrene for the power cable below.I cut out one of the oven doors with a Dremel grinding disk. Using a very long drill bit, I made a hole into the layout through the cutout oven door and fed a red LED bulb though that providing lighting from the inside. Then as with the slag pour scene, I glued bits of smashed orange and yellow glass onto a strip of gold foil, making it long enough to drop into the quencher car from the opening cut in the oven.
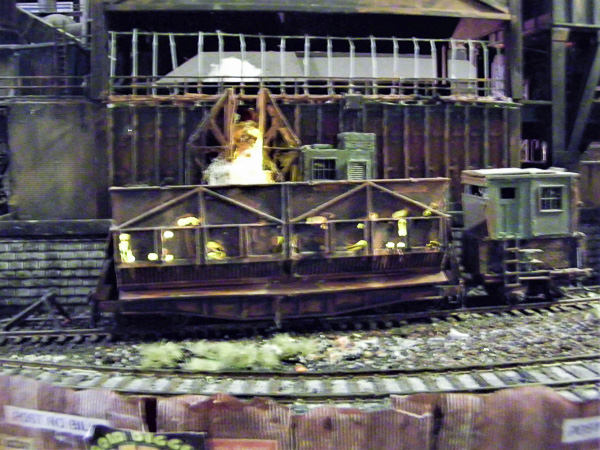
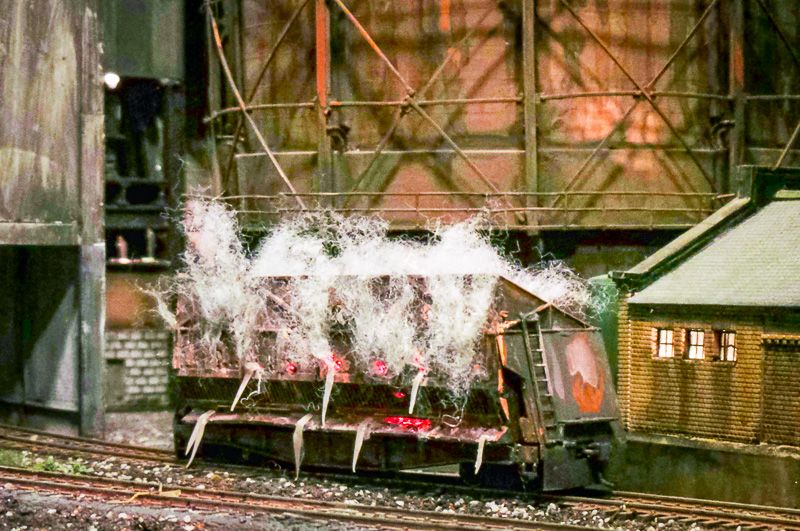
The quencher cars actually required the greatest effort. The hot coke so batters, corrodes and weathers these cars that the glow of the hot coke peeps out of the rusted holes.I used an old worn out soldering iron and a penny.I heated the inside of the quencher car until the plastic began to soften, and then using my finger, I would make a bulge on the outside of the car to replicate the metal fatigue when the hot coke would bend the car walls. I then drilled small holes here and there and the used the iron to make the holes wonky.Rusting the outside was done in the traditional way. Then I lined the inside of the car with reflective cookie wrapping (one can gain a lot of weight doing a steel mill scene) and then drilled a hole to admit a red LED light into the bottom of the car.This was covered over with more red and yellow glass shards.The prototype picture showed a allot of sparks.This I recreated with some gold Christmas glitter. Shreds of hollow fill smoke were then applied here and there.Much the same process was used to make the car that had just been drawn through the quenchers only more hollow fill was added for stream.
Quencher car.
Some fine strips of clear plastic were “dirtied” with a wash of brown paint to depict water draining out of the car.
The prototype picture showed glowing bits of coke that had escaped the car and fallen to the ground. I scattered some fine shards of orange glass on the ballast. All this is just as effective in the “daytime” lighting of the layout as at night due to all the reflective material I used.The prototype also showed puddles of water everywhere resulting from the great steam generated in the quenching process. For this I embedded some selected pieces of dark green glass into the homosote and then surrounded the glass with grass strips and reeds.
I never cease to be amazed at the resiliency of nature to be able to survive in the most hostile of environments.The photographs I found must have been taken in early fall, since there are thistles, goldenrod and cattails everywhere, so I reproduced this. In fact, throughout my industrial urban layout I found myself recreating all sorts of vegetation for the realism I desired.
There is one thing that I have an odd connection to and that is cinders. The anthracite railroads did not use anthracite as that was a valuable product sold for home heating. The actual fuel used was “culm” which was a waste product of anthracite mining. It was pieces of coal bound to shale. The shale was what caused “clinkers” in home furnaces. This is why anthracite burning locomotives required especially large fireboxes with wider grates to allow the clinkers through. Small boys would pick out the culm in the tipples as the coal rushed by. My father had been hired as a “picker” at the age of ten in an anthracite mine outside Wilkes-Barrie, PA.
My association with cinders would take another odd turn much later in my life when we moved to our apartment in New Jersey on the shore of the Hudson.Decades before our apartment had been built, the area had once been a swamp.The anthracite railroads then built into this area to link to the ferry terminal to get to New York at Hoboken (our fair city). The railroads would simply throw their waste cinders into the swamp at the edge of the river, thereby creating more land upon which the railroad yards were extended. Our apartment building was built upon this cinder bed.
About two years into our residence there, I looked from my balcony to see a steady stream of trucks emanating from an excavation operation beyond the ferry terminal. Our doorman told us that a new apartment building was being planned which would have an underground parking garage. I walked over to that area to observe. I assumed these cinders were going to go to a toxic waste dump, but the trucks were heading for the Holland tunnel and into Manhattan. I thought this very odd.I told this to Betty.She daily took The Port Authority of New York and New Jersey (PATH) line under the Hudson which terminated at what had been the World Trade Center. She regularly watched the excavation and preparation of the foundation of the new World Trade Tower as she entered into the station. Betty observed trucks dumping a black material onto the rubble base of the excavated site. This was the very cinders from our fair city.
For the first time in my life, I had a chance to have a close up look at what old railroad cinders looked like. I could see they were a composite of things, not just ash, but also bits of grey stone. I also detected iron oxide as well. Cinders were universally used as ballast on any anthracite railroad and especially around steel mills. The stuff was free material. I had expected to use cinder ballast on my trackage.Instead of just using the black cinder ballast, I mixed it with iron ore and larger sized pieces of grey ballast. My batches didn’t always match as the cinders would vary allot depending on what also got mixed into them at the time.
I worked merrily along for ten years. Then I ran into electrical problems. Unable to find the DCC support I needed, two years would pass before work resumed on the layout.
One day a friend came by and asked to see the layout. With an apology and a shrug, I took him downstairs. I was surprised how enthralled and enthusiastic he was.He said, “What the hell if the engines don’t work, the scenery is more interesting than the trains!” This encouraged me enough to think of the layout as a big diorama. I would just shoot pictures and submit them to Walthers. So, I proceeded to finish off the scenery.
I had passing thoughts of joining the NMRA to get some help with the trains. Finally I did join. South Mountain Division (SMD) members helped resolved my DCC and track problems. Having shared stories associated with my layout, SMD members suggested an article for our Wheel Report. A few days later I fell and bruised my knee. Not being able to work on the layout, I decided to afflict you all with my story.
At present there are no significant operations possible on the first stage of this layout.Hellfire Steel Co. and Brimstone Coke are complete. My plan is to extend things to the Damnation Coal mines (located in Faust, PA).My railroad will continue on to Perdition a Great Lakes port for receiving iron ore. Once finished the Hellfire, Brimstone and Damnation will be the “Road to Perdition.” It is a road well-traveled.
Alex Polimeni, superintendent, NMRA South Mountain Division. (Tom Fedor)
Clutter from the Super’s Desk
The Mini-Con is fast approaching, and I want to thank Pete & Jane Clarke, once again, for doing the heavy lifting to make it happen, as well as all the Division members who have volunteered their time to present a clinic. This event really is something special, and that’s because of you.
Although we’ve had an incredible response for meeting hosts over the past years, we need more volunteers. It’s been Division practice to wait a couple of years before returning to a member’s home. This precedent has caused the well to run dry, so to speak. With that said, if you think you might be interested in hosting, please reach out. I’ve communicated with several members this past season who indicated they don’t have much to show, when in fact they have a fabulous basement full of trains. Additionally, I’m also looking at ways we can make use of clinics along with other railroad activities to bolster our meetings, so that folks who want to host but don’t have a layout can become involved.
Finally, I’d like to remind everyone that 2019/20 Division elections happen in May. If you would like to make a nomination for any officer positions, contact this year’s nominations chair, Scott Schill at scottschill@comcast.net.
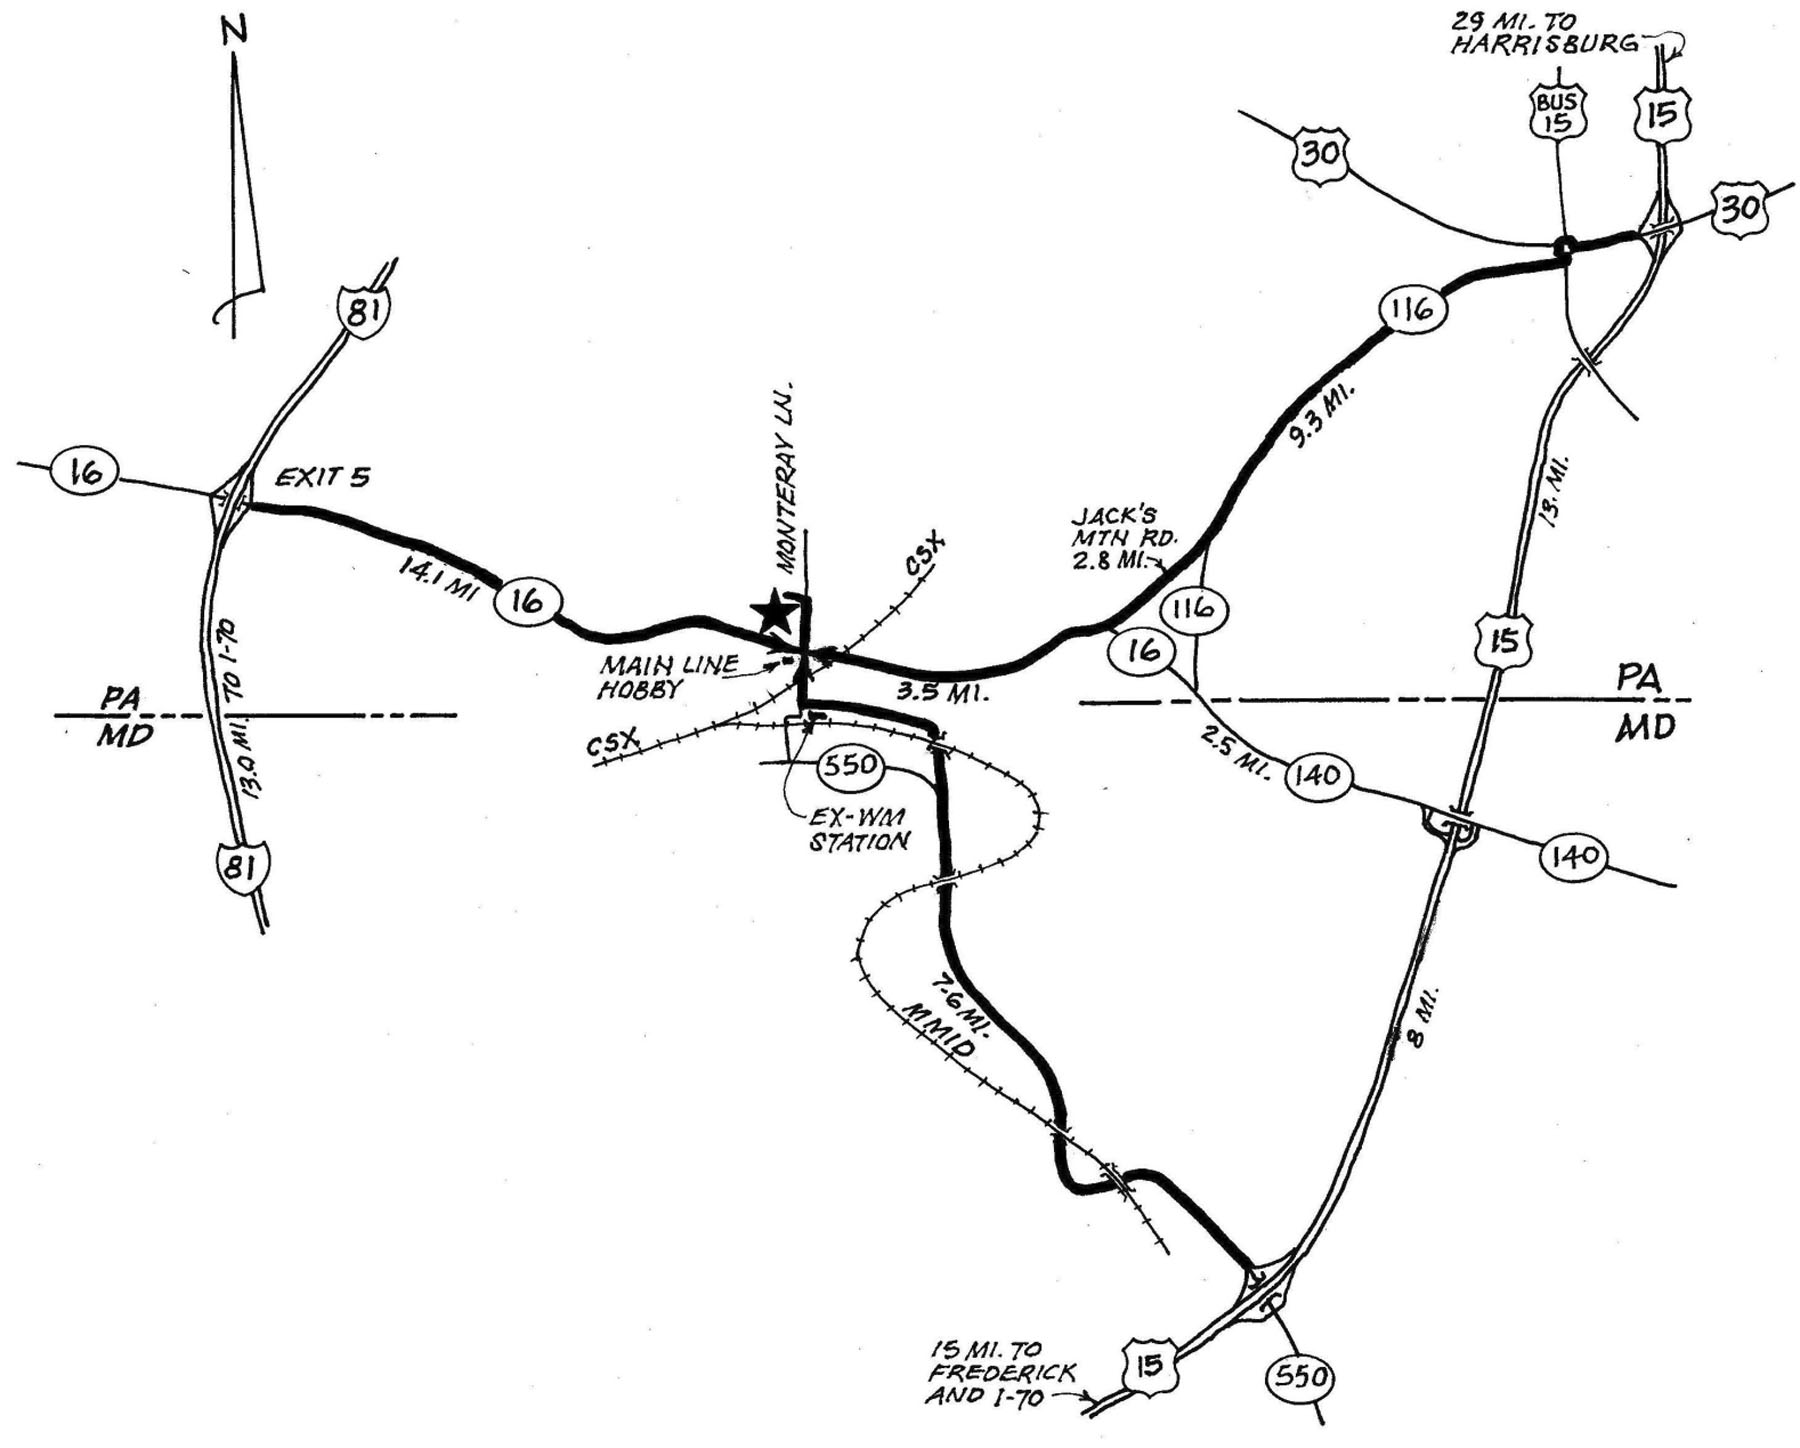
Plans for this year’s Mini-Con have come together nicely. Brian and Bonnie Wolfe of Mainline Hobby Supply have rented the hall, advertised the event, supplied some of the make and take kits, and so much more. Be sure to stop by the shop and thank them. Oh, and buy something while you are there.
The scout troop will offer lunch.
Ray Price, Herb Biegel, Don Florwick, and Grant Berry will greet attendees at the welcome desk.
Informal clinics: 9:00 to 10:00, and again from 11:00 to 12:00
Brian Greenawalt will lead a build on kits (12) donated by Jeff Grove and Carolina Craftsman Kits. HO scale – Carolina Craftsman Kits, Cape Fear Company Houses.
Like last year, each of these will have two sign up sheets. One will be for those 18 and younger.The other for 19 and older. Clinics will be filled first by those from the ‘younger’ list, then filled out by those on the ‘older’ list.Within those categories it will be first come first served.
Modular layouts:
George Sarra will bring another version of his On30 Dead Rail Layout.
SMD members Grant Berry, Bob VanZant, and David Sweeney will have things for sale.
Raffle:
SMD has purchased a $150 gift certificate from Mainline Hobby Supply to be raffled off for $10 per chance. Odds of winning depend on how many are sold. Please note that this certificate can be used to pay for anything offered by the Mainline. Purchase tickets through the morning and the drawing will be at 1:00.
At 3:00 Alex Polimeni will give a talk on “Model railroading as game design.”
You can still help…
Extension cords – We will need several; and surge protectors (that add extra plugs).
For the make and take clinic’s we’ll need all the following, put your name on it and you’ll get it back at the end.We really do need this, you can’t make a kit without tools.
Exacto knife
Flat file
Sprue nippers
Straight edge/ruler for cutting/measuring
Sandpaper
Squares
Super glue
Cutting pads
Toothpicks
Elmer’s glue (for wood kit)
Plastic cement (for styrene kit)
Clamps for gluing corners
Paint (craft acrylics)
Paint brushes
Thinner (not if only acrylics)
Did you notice that the formal clinics are by a model manufacturer, an author, a young guy?
Did you notice that you’ll have the chance to watch something be printed on a 3-D printer?
Did you notice that you have a chance to win a $150 gift certificate for Mainline Hobby Supply and a free $50 gift certificate from HobbyTown USA?
Don’t let the tried and true format fool you, this event gets better each year. It’s going to be a great day. The only way it could be better is if you are there!
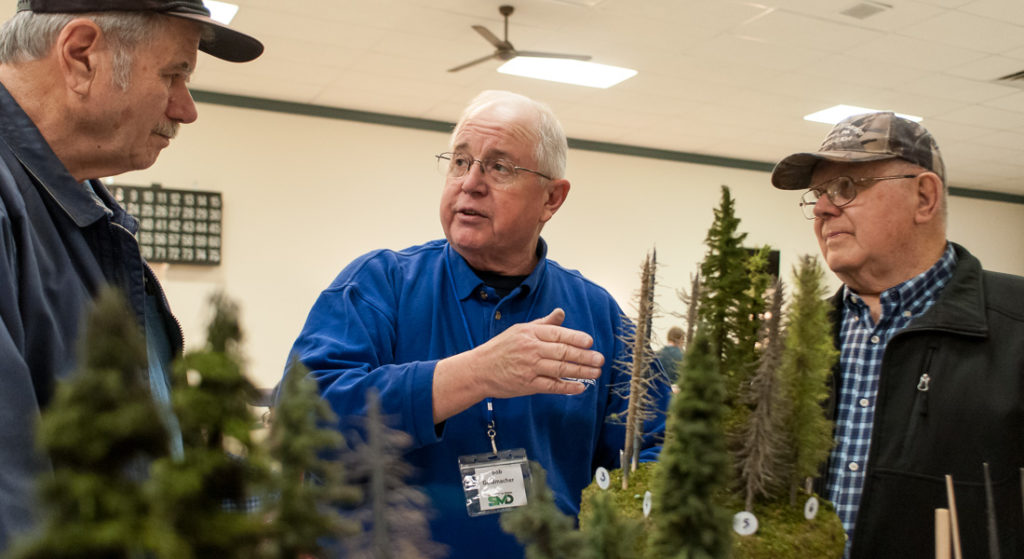
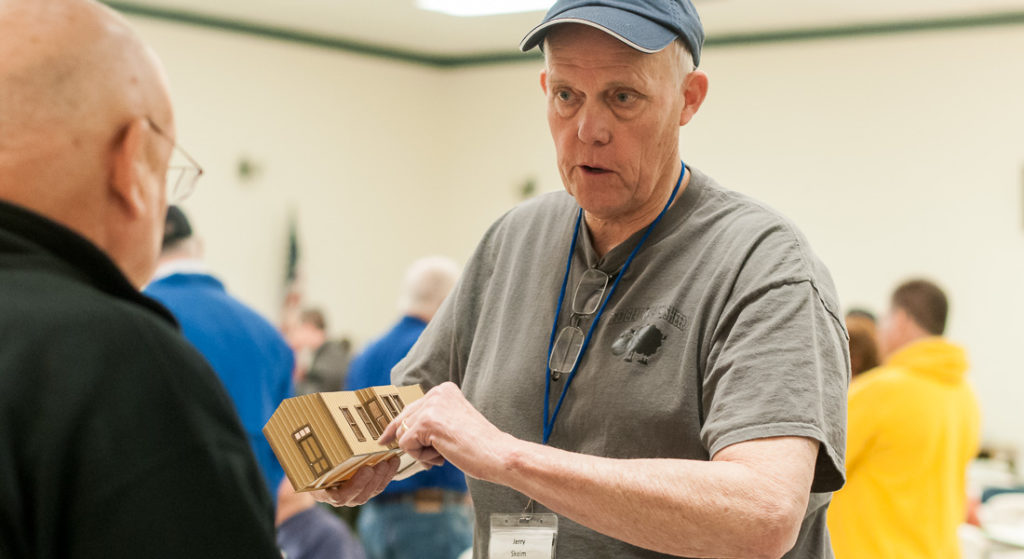
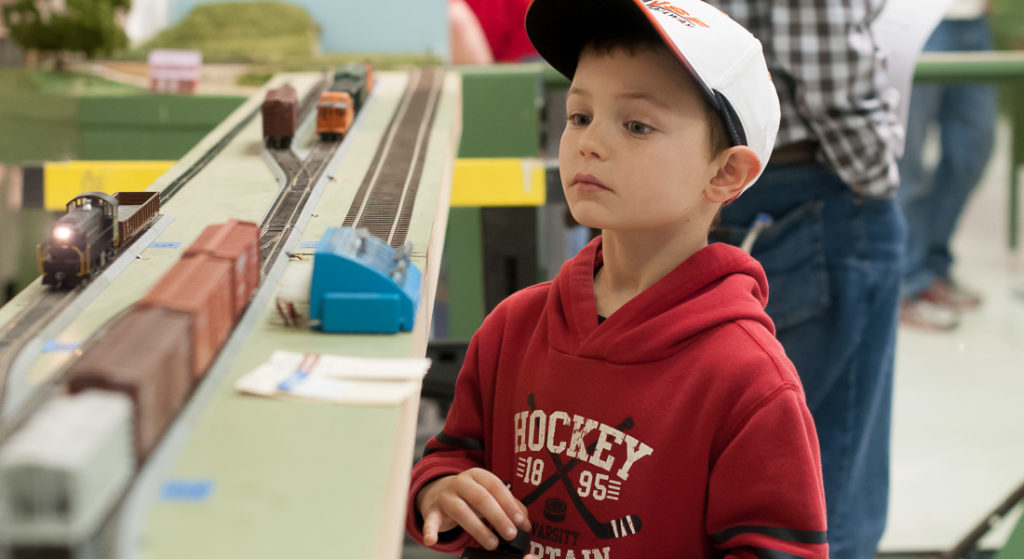
Bob Geldmacher provides instruction on the making of his tall pine trees to Ed Albiker of Bedford, PA (left) and Donald Foor of Everett, PA during the NMRA South Mountain Division 2018 Mini Convention. (Tom Fedor)Jerry Skeim talks about the scratch building of his Woodsboro, MD PRR station during the NMRA South Mountain Division 2018 Mini Convention. (Tom Fedor)Matthew Walter, 6, of Berlin, MD operates a large switching module during the NMRA South Mountain Division 2018 Mini Convention. (Tom Fedor)
Alex Polimeni, superintendent, NMRA South Mountain Division. (Tom Fedor)
Hello everyone,
I am sorry to inform you all that there will be no Division meeting for the month of February. I did not send an earlier notification as I was hoping to work something out, but c’est la vie! I’d like to thank those who have offered to open their homes to SMD but were not able to this month, and to repeat the offer that, if you’re interested but on the fence about hosting a meeting, let me know and we’ll do everything we can to help you get ready.
In other news, I want to give a shout out to Pete & Jane Clarke for their tireless efforts in organizing the SMD’s ever-popular Mini-Con in Blue Ridge Summit once again. If there’s anyone you’d like to see get into the hobby- friends, relatives, there’s always somebody!- now’s the time to nudge them to put April 13th on the calendar. Furthermore, the last edition of the Wheel Report is coming up fast, and Tom Fedor can always use quality content! Snap some picture with your phone and show us what you’ve been working on this winter.
Looking ahead, there are exciting developments in the works for South Mountain in the near future, so be sure to watch this space. In the meanwhile, take care out there, and I hope yo see you all next month!

 After 1929, people held onto their automobiles for as long as they could. Therefor most of the cars found in photos from the era show 20’s automobiles. From the photos of the past it, was apparent I was going to need LOTS of cars to make an authentic 1930’s urban scene. Jorden supplied many of my models and sometimes some good ready-made ones became available. I even located some German cars that were very close in body type to 20’s and 30’s American Cars.
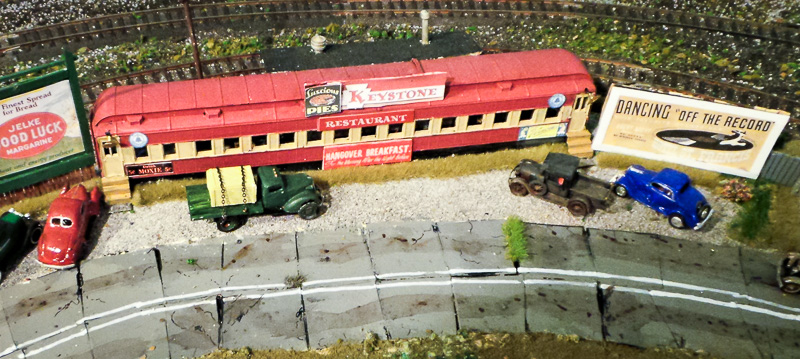
