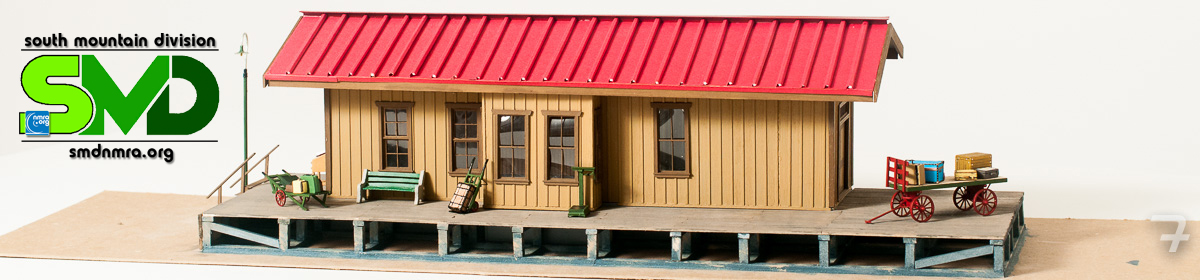
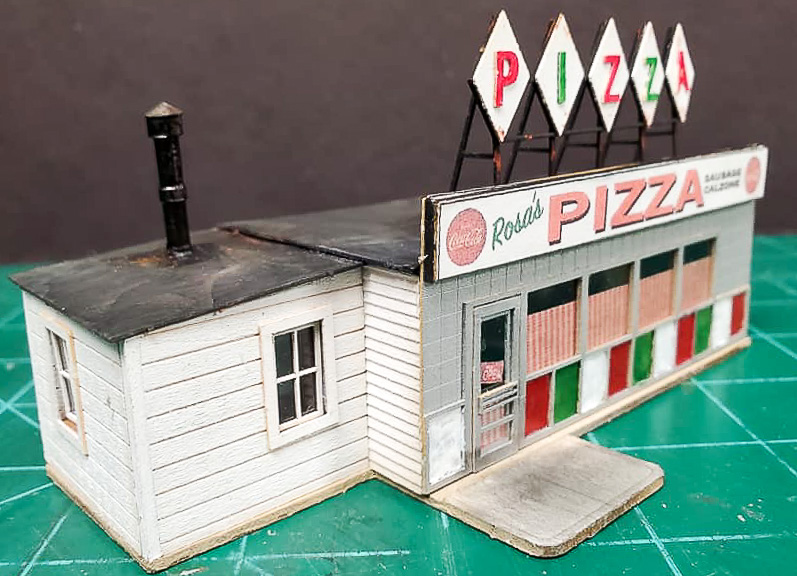
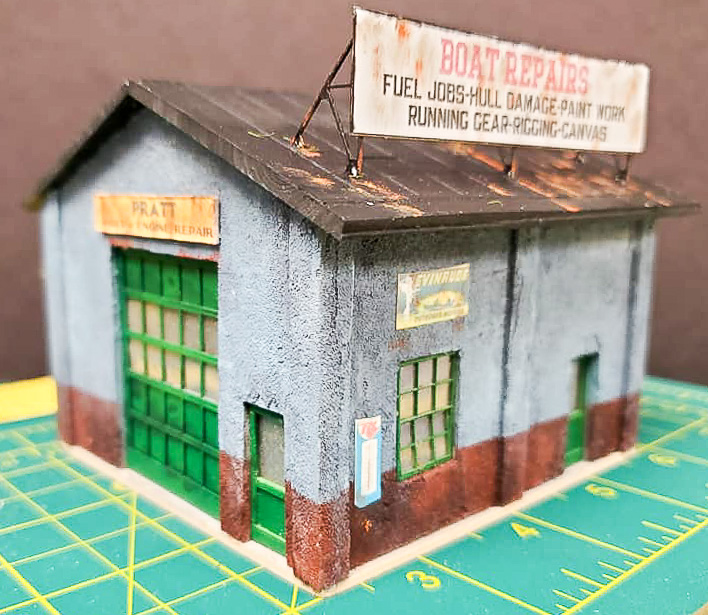
Division member Charles B. Greenawalt will lead the craftsman kit make-and-take at the spring Mini Convention. Charles shares some recent builds fromFOS Scale Models kit of the month series.
He writes, “These HO-scale kits are great for learning how to build structures. FOS Scale Models sells the kits as either a 6-month or a 12-month subscription. The instructions are fairly well written and each kit can be completed in a few evenings.”
Arrive early to sign-up and build with Charles at the Mini-Con.
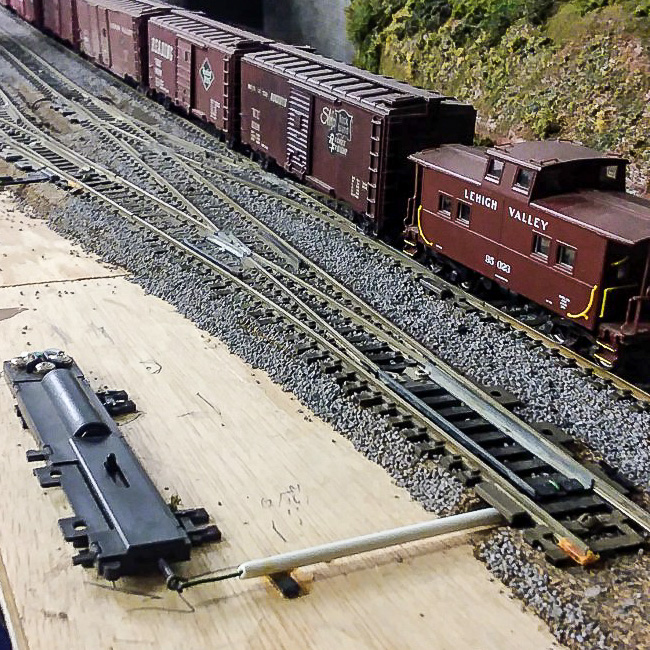
I use Atlas switch machines on my layout. They’re reasonably priced, reliable, and available just about everywhere. I’ve even gotten used to the “buzz-clack” sound as one of them operates. What I’ve never gotten used to, though, is the big, honkin’ piece of black plastic that houses the solenoid. It lays right by the track and, in my opinion, bears no resemblance to anything prototypical. Because of this, I’ve devised ways to hide or disguise them.
I am aware of Atlas’s switch machines for “under table” mounting. I’ve used them in the past and they work well. But as my age advances and bad knees become more of a fact of life, I want to make as few trips as possible under my layout. I’ve decided to keep switch machines above ground, so to speak. I also know that Atlas includes a little piece of black plastic that allows you to mount the machine a bit further away, but even that’s not far enough for me. I prefer to have at least 3 to 4 inches between a turnout and the machine to allow for my coverings.
The first thing I do is work out a way to mount the machine at least a few inches away from the turnout and create the connection. When mounting them in this way, Atlas’s “left/right hand” switch machine designations do not matter because those cast-on track connections won’t be used.
My method uses a piece of green florist wire that is about 3/4 inch longer than the distance between the center of the turnout’s points and my Atlas switch machine throw bar’s location. First I measure 3/8 inch from one end of the wire and bend it up 90 degrees. Then I measure 1/8 inch from the tip on that bent end and bend it another 90 degrees, perpendicular to the first bend. Fit it into the hole on the turnout’s throw-bar. It should now extend, perpendicular to the track section, underneath the throw-bar. I do this before I mount the turnout on the roadbed.
Trim the roadbed under the throw-bar to allow the wire to freely move under the points. Note that the wire must also lay flat on top of the throw-bar so a passing coupler trip pin doesn’t get snagged.
It may take some trial and error to get this right. I use code 100 track and the measurements for bending could be different for different codes of rail or other manufacturer’s track. The measurements above are estimated. Florist wire is inexpensive. If it’s not correct, I toss it and do another.
Next, with the wire protruding out from the turnout to where the machine mounting spot will be I run the wire through a length of plastic tube that will fit between the roadbed and the machine. This allows me to cover the connection, preventing scenic material and adhesives form interfering with its movement. At the switch machine, the wire is bent around the actuating lever and squeezed down using pliers to reduce any play.
Holding the switch machine in it’s mounting spot, I check to see if everything works. In general, I keep the switch machine and turnout parallel to one another. When it functions smoothly, I permanently attach the switch machine and turnout with adhesive caulk. This will hold it, more or less, permanently. Since caulk always retains some resiliency, I’ll be able to replace it (with perhaps some small effort) if necessary. On occasion, I’ve mounted the machine on a small piece of cork roadbed, which puts it at the same height as the turnout. Using this method allows me to run a longer actuating (floral) wire under an adjacent track inside the plastic tube.
Disguising the machine consists of multiple methods. All of this should work for other types of switch machines. One advantage of Atlas machines is they are fairly flat. This helps with hiding them. The accompanying photo shows several of the ways I’ve done this. A small building with a slot for the wire to go through can be whipped up in minutes. Leave the building loose for adjustments or repairs. I also hide them behind trees or ground foam bushes. If going this route, I cover the actuator pin opening in the machine while gluing, painting, or working with foam. I’ve can also made a small knoll out of carved foam to fit over the machine, covering the knoll with ground foam, grass, and weeds to blend in the rest of the scenery. If this knoll is by an industrial area, I would cover it with mixed, small pieces of junk to resemble a scrap pile. Since the machines are flat, I’ve also hidden them behind fences, extend an inch or two beyond the edges of the machine, completely hiding them. Fences are often good if there’s just no room for anything else.
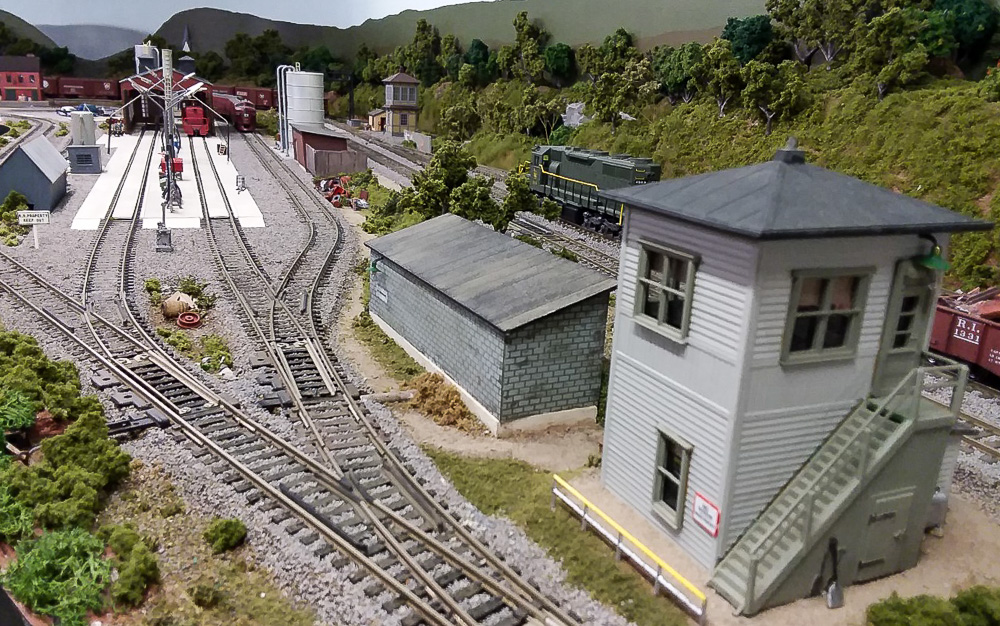
Above is the Easton engine terminal on my Lehigh Valley RR, where six Atlas switch machines are hidden. Clockwise from the left: #1 inside the gray shed, #2 inside the red shed, #3 behind the hillside, #4 behind the bushes, #5 behind the block shed and #6 behind the shrubs across from the block building.
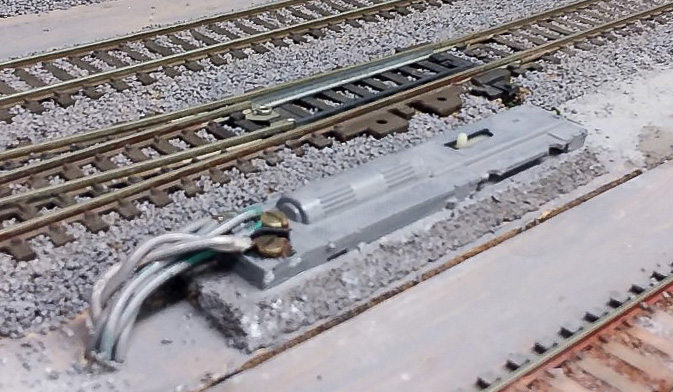
However, there are “worst case” scenarios. What if there’s simply no space for mounting the switch machine other than right by the track as Atlas intended? If I can’t hide it, I camouflage it. This is easily done by painting the machine (below) the same color as the ballast, making it much less noticeable. Oddly enough, over the years I’ve met many modelers who have simply never thought that you could paint the switch machine. As long as paint doesn’t get into the operating area it works fine. Depending on the surrounding scenery, I recommend gluing a few small pieces of foam on the sides to help the machine blend in better.
So that’s how I do it. It’s not difficult and allows me to keep using my preferred brand of switch machine. Try it and see if you like it. I assure you, your back and your knees will thank you!
(For the purpose of this article, we will consider Large Scale to be the part of the model railroading hobby that uses scales larger than O scale – 1:48 in the US – and smaller than ride-on live steam to run primarily on Gauge One track – 45 mm — with some on O gauge and some on HO gauge.)
(Most of what I have written is my own thinking based on commonly known information about modeling in the larger scales. For those who want to learn more, I have included a short list of suggested further reading at the end of this article.)
Large Scale has a lot of scales — two dozen or so by my count. Each of those scales has more than one name. (One scale — 1:22.5 — has at least seven names.) At the same time, it seems that all these scales are referred to as “G Scale,” and they all use the same three track gauges (Ga. 1, O gauge, and HO gauge). For small scale modelers and quite a few large scalers, that situation is more than a little confusing.
Some Theorizing about Factors in Scale Model Railroading and How They Relate to Each Other:
As scale model railroaders, we are interested in four essential factors in our modeling: #1 the size of the prototype, #2 the size of the model, #3 the track gauge of the prototype, and #4 the track gauge of the model. Since we are striving to model accurately, we are particularly interested in how these factors relate.
The first two — size factors — are related by the concept of scale, defined as the relationship between the size of the prototype and that of the model. Scale is commonly represented by a ratio such as 1:87 for HO and as a dimension such as 3.5 mm per foot, again for HO.
How then do we link scale with the gauge factors? It is fair to say that we conceptualize the relationship between scale and gauge in our thinking with a mathematical equation like this one:
Scale x Prototype Gauge = Model Gauge
Thus, an O scale model of a 3 ft. narrow gauge prototype has a model gauge calculated as follows:
1/4 in. per ft. (the dimensional equivalent of 1:48) x 3 ft. = 3/4 in. (the gauge known as On3).
(I am sure this reasoning seems fairly obvious to most scale model railroaders.)
The original standardized scales and gauges decided on at the turn of the 19th to 20th centuries were likely developed by similar thinking. Manufacturers decided on a size (or sizes) for their trains (basically scales) and then used that factor to determine an appropriate gauge. Standard setting made it possible for trains from different manufacturers to run on the same gauges of track and gradually to use the same set of scales. These early manufacturers started first with size/scale; therefore, this way of thinking looks at the relationship between scale and gauge from a scale-first point-of-view.
A Different Gauge-First Point of View:
While thinking scale-first may seem perfectly reasonable to scale model railroaders, it is not the only way to look at the relationship between scale and gauge.
So, let us go back to that original equation relating scale and gauge factors:
Scale x Prototype Gauge = Model Gauge
With algebra, we can turn that equation around:
Model Gauge = Scale x Prototype Gauge
Dividing both sides by Prototype Gauge, we arrive at:
Model Gauge ÷ Prototype Gauge = Scale
(That equation does work out with the units involved — below in English dimensions but also with metric or a combination):
Inches ÷ feet = inches per foot
Thus, the use of a little bit of math (which hopefully we remember from high school) has shown us that a different gauge-first point of view is also mathematically valid for relating all the size and gauge factors. We will find that this gauge-first way of thinking was the starting point for many activities in Large-Scale.
But why would anyone who wants to model to scale put gauge first? That is a good question, the answer to which requires some history of modeling in the larger scales.
A Bit of History
The Early History of model railroading was dominated by the larger scales. Most of the miniature trains built in the 19th century (whether toys or “scale” models) were built in the larger scales. By the end of the 19th century, there was a great amount of chaos in the hobby as each manufacturer made products using their own gauges and scales. Mӓrklin had the foresight to realize that shared standards would benefit the new hobby greatly by allowing customers access to a larger range of products through “interchangeability.” Mӓrklin proposed the first set of standards for scales and gauges No. 1 through No. 5 or 6 (Arabic numerals with No. 1 the smallest). (All of these fall within today’s Large-Scale range of sizes.) Note that the gauges associated with those scales were all based on modeling standard gauge prototypes. Narrow gauge modeling was extremely rare.
The twentieth century: Unfortunately, the popularity the larger scales had enjoyed in the 19th century vanished in the first half of the 20th as smaller scales and gauges were made practical by better manufacturing processes and electric propulsion. The beginning of the century saw the development first of Zero scale (now known as O scale), then OO scale (smaller than zero — the next name in many numerical naming systems — think paint brush sizes), and soon HO scale (half O). Again, the associated gauges were all based on modeling standard gauge prototypes.
Narrow Gauge: The 1920s saw a few modelers become interested in modeling narrow gauge prototypes. In order to do so, they often had to take creative approaches to get the resources they needed. Pioneer narrow gaugers like Hugh Boutell and P. D. Hancock resorted to re-gauging wheels and mechanisms from other scales for their models. It was a time of much “thinking outside the box” for narrow gauge modeling.
The Development of Sixteen Millimeter Scale
In the years leading up to and following World War II, a small group of British modelers wanted to model their 2-foot gauge prototypes. Like other pioneer narrow gauge modelers, these British modelers thought outside the box to accomplish their modeling goals. In the process, they managed to blaze a trail for a rejuvenation of modeling in the larger scales.
The following is not intended as a history of 16 mm Scale, that feat having been accomplished by the Association of 16 mm Narrow Gauge Modellers when they published History of 16 Mil and the Association by John Wenlocke in 2017. Mr. Wenlocke, a long time 16 mm modeler, has written an extensive, detailed account reaching back to early mentions of 16 mm and 5/8 in. modeling by Allan Pratt and J.I.C. Boyd in the late 1930s model journals. However, despite knowing and speaking with quite a few well known early 16 mm modelers, Mr. Wenlocke was able to pin down only some of the names of the “Group of Seven,” the early 16 mm pioneers whom he described as giving “tantalizing glimpses of their ‘subversive’ efforts [by publishing] in the modelling press from time to time.” As to their thoughts about setting up this new activity, all Mr. Wenlocke was able to recover were observations such as that of Peter Jones’s (another early — 1940s – 16 mm modeler): “16 mm to the foot scale on 32 mm gauge track was a happy and obvious combination [emphasis added].” Clearly, much of the thinking of the first 16 mm modelers is lost to us in the mists of a time now 80 plus years ago. (All quotes are from Mr. Wenlocke’s history.)
Consequently, what follows is my attempt to reconstruct a logical thought process leading to the decision to model in 16 mm Scale. Although what I have written contains a substantial amount of conjecture, I think it conveys the essence of what 16 mm Scale modelers were up against and how creatively they responded.
3(or Rather 4) Challenges:
These British modelers faced challenges: issues related to layout & model size, discouraging economic prospects, and constraints of gauge. (Each challenge described is followed by their response in italics.)
Lack of space: British homes did not (and, to an extent, still do not) provide generous space for layouts.
The founders of 16 mm scale bypassed the lack of layout space indoors and took advantage of the British tradition of garden railroading. Outside in the “garden” (the yard to us colonials), space was much less constricted.
Lack of small motors: While lack of space might have argued for using smaller scales, the lack of small motors argued for the opposite. Electric motors of the time were huge, a fact that had forced even O standard gauge modelers to put motors in tenders. In Britain, this problem was compounded by the relatively small size of British prototypes. And then, to make the problem worse, narrow gauge prototypes are even smaller — a fact that argued for the use of scales a good bit larger than O to fit the available motors.
Garden railroading also allowed these modelers to model in a much larger scale — one big enough to fit the large motors available at the time into their narrow gauge equipment.
The post-war economic situation: The overall economy of the time was focused on recovery from the Depression and the War. The larger scales, which had dominated the hobby in the nineteenth century, no longer did so and, consequently, had become minority interests. Model manufacturers did not have capital resources to bring out new lines of trains for minority interests. In addition, the conventional wisdom in the hobby at the time said that growth would be in the smaller scales — wisdom borne out by the increasing popularity of OO and HO scales and the development of even smaller scales (TT, N, and Z). Besides, before WWII, faced with a shrinking market, many of the manufacturers of larger scale trains either had gone out of business (as Ives did) or had converted to the smaller scales (as Lionel did when they dropped their Standard Gauge line to focus on O gauge trains). These 16 mm Scale modelers realized they were on their own, without manufacturer support.
To counteract the lack of manufacturer support, these modelers took advantage of an opportunity available to all who model narrow gauge: the fact that a gauge developed in one scale to model standard gauge prototypes can be used in a larger scale to model narrow gauge. By using an existing gauge from another scale as the basis for their modeling, they could counteract the lack of manufacturer support and gain access to wheels, mechanisms, and track supplies — essential resources. Coming from the British modeling tradition, they figured they could scratch-build the rest. Then, using that gauge, they would create their own new, larger scale.
One further challenge related to garden railroading:
The width of the track gauge: Indoor model railroaders might not expect this to be a challenge, but when modeling outside, the rule of thumb is that a wider gauge is better for track durability/stability and ease of maintenance. O gauge – 32 mm in Britain, 1-1/4 in. in the US – is generally considered the smallest practical size for garden railroads. Thus, the challenge for the founders of 16 mm Scale was to find a wide enough gauge with manufacturer support (wheels and mechanisms) to allow for modeling outside.
As discussed in the next part, they decided to use O gauge.
Possibilities Considering the Established Scales:
These were scale modelers who wanted to model accurately; so, undoubtedly they considered the established scales in their search for a workable scale and an accurate corresponding gauge for 2-foot models in that scale. (One thing that becomes abundantly clear from this consideration of the established scales is that, to get a gauge wider than O gauge, they would have to use a scale much larger than O scale.)
O Scale (1:43.5 in Britain) was too small for the available motors, and the resulting gauge of 14 mm (roughly 1/2 inch) for two-foot prototypes was far too narrow for easy use outside.
Scale One (1:32) was larger, but its gauge of 3/4 inch still was not wide enough.
Scale 2 (1:27.4) and a gauge of 7/8 inch would not work either.
Scale 3 (1:22.5) with a gauge of approximately 1-1/16 inches might work, but very little was produced in that scale at the time and nothing in that gauge.
Scale 4 (1:16) with a gauge of 1-1/2 inches might work, but again, there was nothing available in that gauge.
Consideration of the established larger scales did not get the British modelers the gauge-related resources they needed.
After some thought, they decided to take a gauge-first approach. Instead of focusing on the established scales (and new gauges that were not likely to be manufactured), they would use a gauge that was readily available: O-gauge, which they knew would work outside. Doing so gave them access to the wheels, mechanisms, and track products they needed.
Then, they went on to develop their own new scale. Here is how they likely reasoned employing the gauge first version of the equation we developed earlier:
Model Gauge ÷ Prototype Gauge = Scale
Using O gauge, they filled in the numbers:
32 mm (British O gauge) ÷ 2 feet = 16mm/foot
This new scale they created – 16 mm Scale – has a scale ratio of 1:19, a size between the established Scales 3 (1:22.5) and 4 (1:16). After nearly a half century of decline, 16 mm Scale represented the first new activity in the larger scales. Apparently, the larger scales were not as moribund as they seemed to be after WW II.
Today in Britain, 16 mm Scale – roughly 5/8 inch per foot — is often referred to as SM32 (Sixteen Millimeter scale/32 mm gauge).
One very important thing to note: these were modelers, not manufacturers, coming up with a new scale and a new approach to the hobby.
Their strategy can be summed up as follows: #1 modeling in the garden, which offered them room to run larger models; #2 using a larger scale so that their models would be big enough to house the motors available at that time; and #3 most importantly, adopting an existing gauge from another scale to give them gauge-related products.
A Gauge-First Modeling Strategy for Large-Scale:
Adopting a gauge developed for another scale has proven to be an extremely successful strategy for other large scale activities over the years. Lehmann took an approach similar to that of the 16 mm modelers when they adopted Gauge One to model meter gauge prototypes in Scale 3.
(scale ratio 1:22.5)
45 mm ÷ 1 meter = 13.55 mm per foot
Somewhat later, American modelers developed 2 scales new to model railroading when they adopted Gauge One to model both 3 and 2 foot narrow gauge prototypes:
(scale ratio 1:20.3)
45 mm ÷ 3 feet = 15 mm per foot,
and using the old dimension for Gauge One
(scale ratio 1:13.7)
1-3/4 inch ÷ 2 feet = 7/8 inch per foot.
Other modelers have adopted Gauge One to model 42 inch prototypes:
(scale ratio 1:24)
1-3/4 inch ÷ 3-1/2 feet = 1/2 inch per foot.
Modelers using O gauge like the 16 mm modelers revealed additional narrow gauge modeling opportunities. Combining O gauge with Scale 1 worked for meter gauge — a new use for an old scale:
(scale ratio 1: 32)
1-1/4 inch ÷ 3-1/4 feet = 3/8 inch per foot.
Combining O gauge with 1/2 inch scale worked for 30 inch gauge — a new use for another old scale:
(scale ratio 1: 24)
1-1/4 inch ÷ 2-1/2 feet = 1/2 inch per foot.
The result of these developments was that Large-Scale quickly accumulated 6 scales (1:19, 1:22.5, 1:20.3, 1:13.7, 1:24, and 1:32) used with only 2 gauges (Gauge One and O gauge). While 6 scales is a far cry from the two dozen mentioned at the start of this article, these 6 are not the only ones possible as a result of gauge-first thinking. What we have seen is that most of these efforts were begun without manufacturer support: modelers (on their own) finding ways to accurately model their favorite prototypes by borrowing gauge-related resources from other scales. (That was, by the way, the strategy used by both On30 and HOn30 pioneer modelers.)
A gauge-first way of thinking has given us a key to unlock what is going on in Large-Scale and has revealed some important points:
Scale is not the only way to develop new activities in the hobby; gauge works just as well, especially for Large-Scale.
Model Gauge ÷ Prototype Gauge = Scale
A gauge developed in one scale to model standard gauge prototypes can be used in a larger scale to model narrow gauge. The 16 mm modelers realized this fact allowed them to use readily available O gauge products. As a result, they could get their activity going without manufacturer support (except those “unwitting” O scale manufacturers).
Each of the scales developed or adopted offered modelers a new and different opportunity to enjoy the hobby — many related to accurate modeling of a specific prototype. The more scales they tried; the more opportunities they discovered.
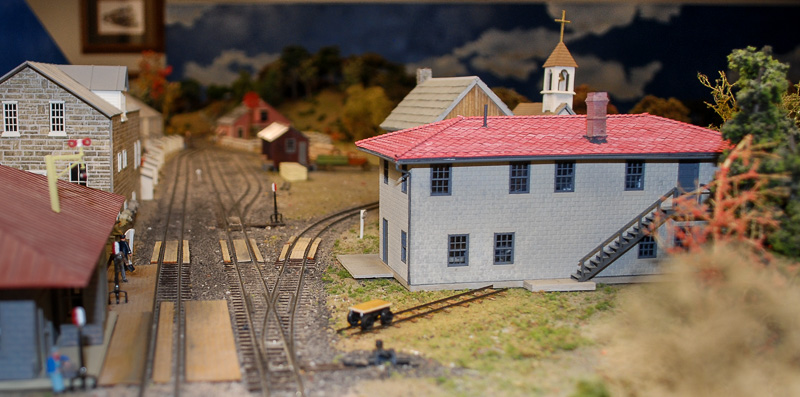
It’s quiet right now in Robertsdale, PA. But the mail train will soon arrive. So the post office clerk has positioned the pushcart into the spot where the crew will offload mail from the combine. The clerk will then push the cart over to the Post Office building, and toss the mail through the window. Every time he does thischore I’m sure he asks himself, “why couldthey bother to lay this track, but not bother to put in a door!”
That’s the way it was on the EBT. That’s the way it is on Pete and Jane Clarke’s HOn3 EBT as well.
Thank you to Wade Woodcock for the 3-D printed “Old Post Office” kit. Frank Benenati assembled the structure.
Lifelike produced a huge number of these caboose years ago. They are readily found at train shows and on eBay. I acquired a few of these in both the boxcar red “Speed Lettering” and “Circus Color” paint schemes, and need to bring the “Speed Lettering” cars forward, era-wise, into the 1980s.
Starting with a Proto 2000 Steel Center Cupola Caboose I used the following material to complete this project.
MicroScale Industries 87-700 Western Maryland Cabooses decals
Badger ModelFlex – UP Harbor Mist gray – used as a primer, use whatever primer you like best
Note: For the Vermilion sash and door trim you could use Tru-Color TCP-307 Chessie Red-Orange. I used a bottle of the actual Chessie Vermilion that was given to me decades ago by a WM shop foreman. I have carefully kept it sealed all these years and it was still usable after being thinned for the brushwork.
Note: Tru-Color paints require acetone cleanup. You may want to substitute your favorite water-based acrylic-based paints as I find that Tru-Color is difficult to airbrush and cleanup.
Disassemble and paint-strip the caboose. 90% isopropyl alcohol in a glass jar works very well to strip paint. Let it soak overnight. Scrub with a toothbrush and let it soak another evening. After round two the paint will be gone. Wash in hot soapy water, rinse well, and let dry. All the parts stay in a project box until needed.
The first trip to the paint booth is for the primer. I use whatever gray I have on hand, shot through a Badger dual-action brush, and spray at about 15psi.
Next, mask the body and shoot the aluminum paint for the roof. 3M #2098 UltraSharp Lines Multi-Surface painters tape is my favorite masking tape. Rarely will there be paint bled-through and the edge of this tape is razor-sharp.
After the roof color has been applied, mask the roof and shoot the yellow next.
Now the tedious part comes into play, painting the window and door sashes. I use MicroScale Industries Micro Mask and a 2/0 or 0-size brush to carefully apply the Micro Mask to the body around the window sash.This is in lieu of using the 3M tape which is very time-consuming to cut and apply.
Using a 2/0 brush apply the vermilion color to the sashes and door frames. The key to a professional-looking finish is being comfortable while applying both the Micro Mask and vermilion paint. I work at a well-lit workbench, use an Opti-Visor with LED lighting, and a foam-based car cradle to hold my work. I also rest my painting arm and elbow on a soft towel so that I don’t become uncomfortable and rush the work.
Another trip to the paint booth to shoot a gloss coat on the car,I use MicroScale Micro Gloss and thin it slightly before airbrushing. I have also had success using Pledge Liquid Floor Gloss. Thin it with water and brush it on the areas where you will be applying decals.
Using a prototype photo, cut the decal sheets to obtain what you need. I cut the decals as close to the artwork as possible using either a hobby knife with a fresh blade or manicure scissors. Apply the decals after letting them soak just long enough to slide off the backing paper. Position in place and let dry. After the decals are fixed in place apply your favorite decal setting solution, in my case that is slightly thinned Walthers SolvaSet. This wetting/softening solution is very aggressive and older decals may start dissolving or falling apart if you use it without thinning.
I model the early 1980’s so a Clean, Oil, Test, and Stencil (COTS) decal was applied. Notice there is no ACI label. The railroad industry gave up on the ACI car identification system in the late 1970s due to the unreliability of reading the labels and the cost involved in maintaining them.
The end platforms were hand-painted using the Tru-Color Chessie Yellow and the end rails were done in my vermilion color.
Again, images of the ends of the car are very useful as there seems to be a wide variation as to what safety appliances (handrails, step tread edges, and grab irons) got the vermilion color depending on who did the repaint.
One last trip to the paint booth for a shot of clear flat to hide the decal edges,I use Badger ModelFlex 16-601 Clear Flat or if I want to go “old school” I’ll shoot Floquil Flat Finish.
Finishing up the model included painting the wheel faces and backs with a muddy/grime color, I use a cheap acrylic paint from Hobby Lobby made by FolkArt called #940 “Coffee Bean”. It has just the right amount of brown and dark tints that makes for a convincing wheel finish. The Kadee couplers are lightly painted with the same color using care not to gum up the workings of the knuckle.
Weathering involves using light gray, black, and brown powders that I get by shaving art pastels. I shave the individual colors into an egg container compartment. This technique has worked very well and is inexpensive compared to buying weathering powders sold for model railroad applications.
After weathering, the car is complete and ready to get back on the rails. It takes me about 4 hours in total to do one of these way cars, spread over a week of evenings. I hope you enjoyed this how-to feature and picked up an idea or two.

 From
From  That’s the way it was on the EBT. That’s the way it is on Pete and Jane Clarke’s HOn3 EBT as well.
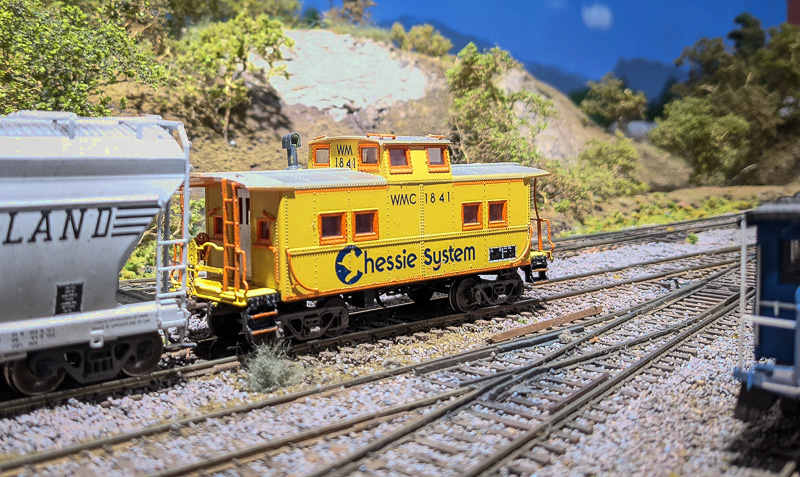 From
From 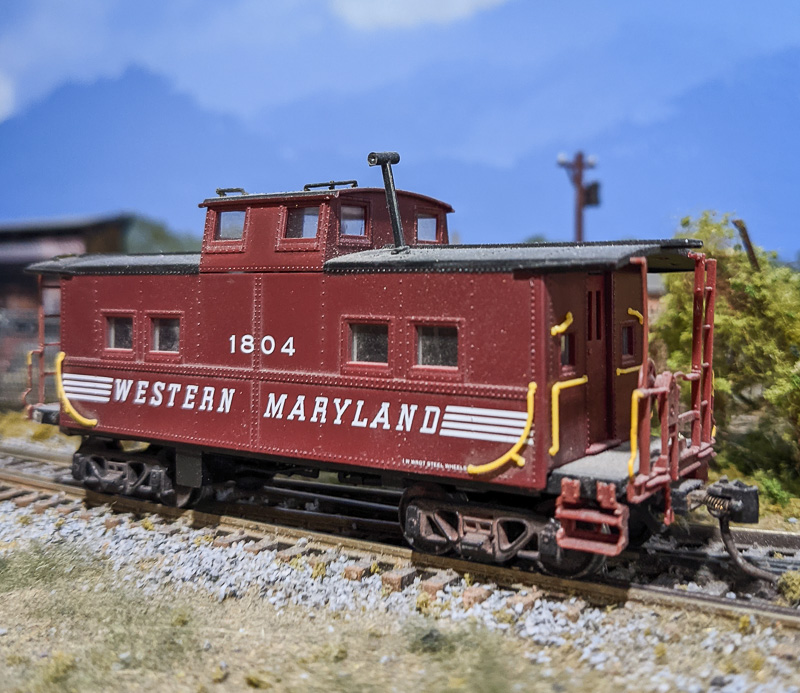 Starting with a Proto 2000 Steel Center Cupola Caboose I used the following material to complete this project.
 Disassemble and paint-strip the caboose. 90% isopropyl alcohol in a glass jar works very well to strip paint. Let it soak overnight. Scrub with a toothbrush and let it soak another evening. After round two the paint will be gone. Wash in hot soapy water, rinse well, and let dry. All the parts stay in a project box until needed.
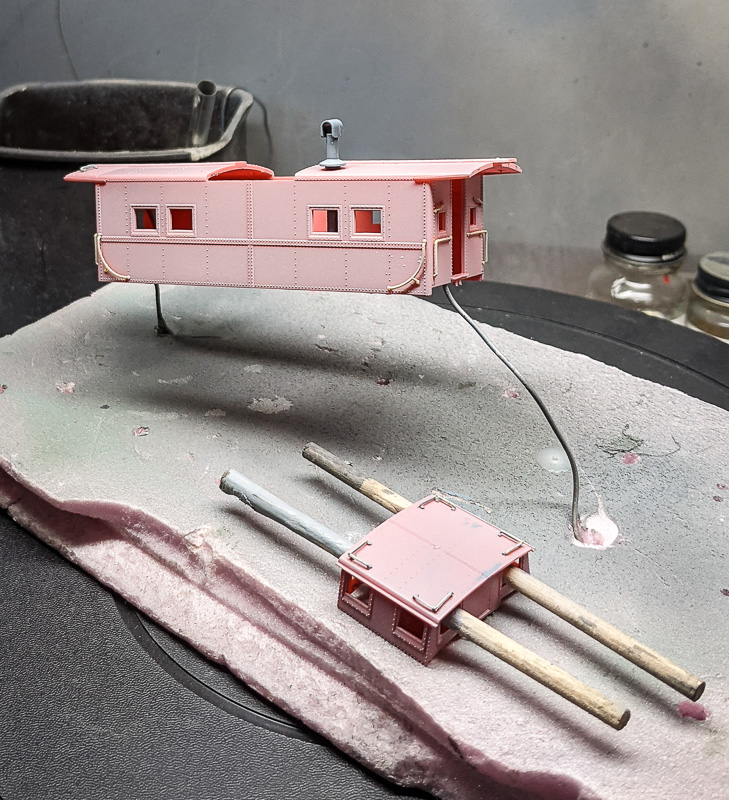 The first trip to the paint booth is for the primer. I use whatever gray I have on hand, shot through a Badger dual-action brush, and spray at about 15
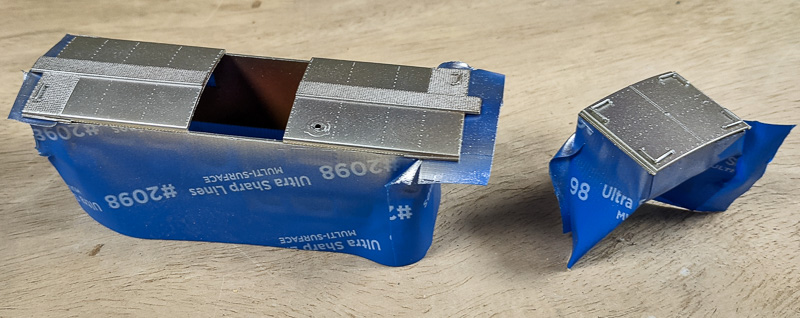 Next, mask the body and shoot the aluminum paint for the roof. 3M #2098 UltraSharp Lines Multi-Surface painters tape is my favorite masking tape. Rarely will there be paint bled-through and the edge of this tape is razor-sharp.
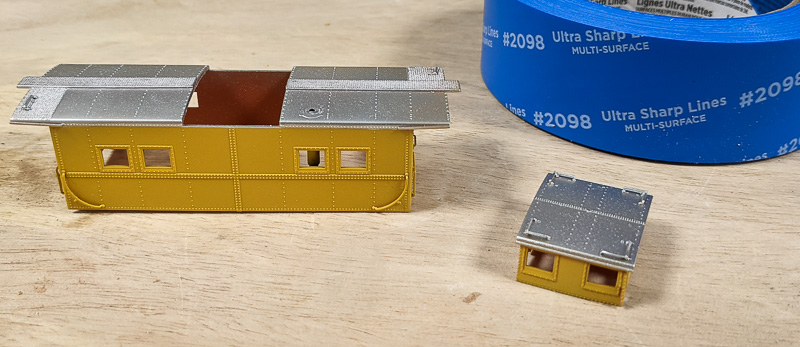 After the roof color has been applied, mask the roof and shoot the yellow next.
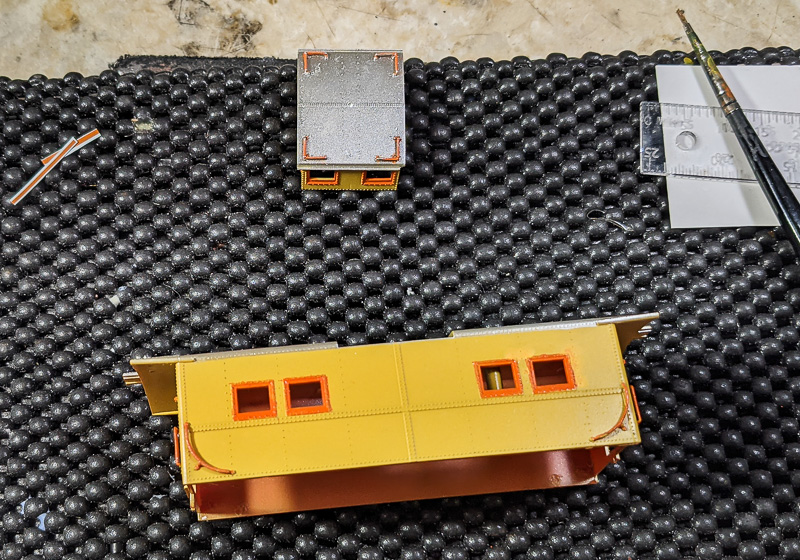 Now the tedious part comes into play, painting the window and door sashes. I use
 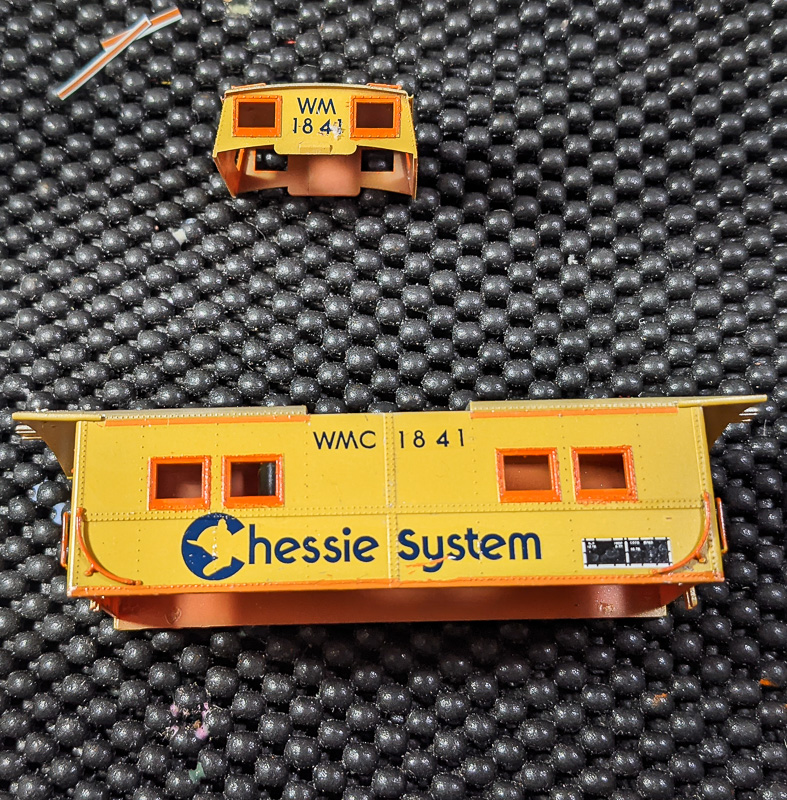 Another trip to the paint booth to shoot a gloss coat on the car,
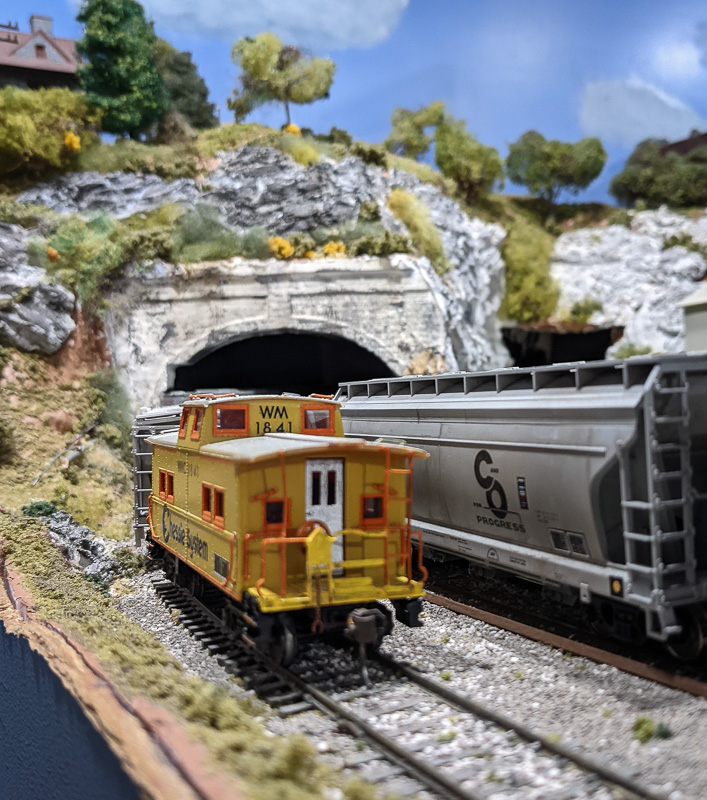 The end platforms were hand-painted using the